Loki微服务模式
作者: Ryan 发布于: 2/29/2024 更新于: 8/15/2025 字数: 0 字 阅读: 0 分钟
前面我们提到了 Loki 部署的单体模式和读写分离两种模式,当你的每天日志规模超过了 TB 的量级,那么可能我们就需要使用到微服务模式来部署 Loki 了。
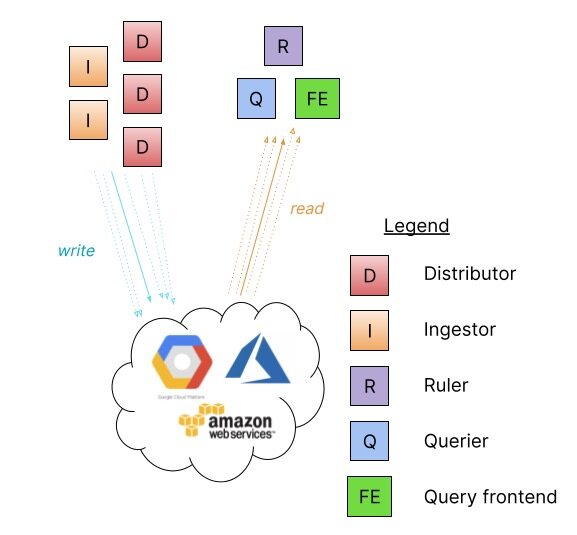
微服务部署模式将 Loki 的组件实例化为不同的进程,每个进程都被调用并指定其目标,每个组件都会产生一个用于内部请求的 gRPC 服务器和一个用于外部 API 请求的 HTTP 服务。
- ingester
- distributor
- query-frontend
- query-scheduler
- querier
- index-gateway
- ruler
- compactor
将组件作为单独的微服务运行允许通过增加微服务的数量来进行扩展,定制的集群对各个组件具有更好的可观察性。微服务模式部署是最高效的 Loki 安装,但是,它们的设置和维护也是最复杂的。
对于超大的 Loki 集群或需要对扩展和集群操作进行更多控制的集群,建议使用微服务模式。
微服务模式最适合在 Kubernetes 集群中部署,提供了 Jsonnet 和 Helm Chart 两种安装方式。
安装
同样这里我们还是使用 Helm Chart 的方式来安装微服务模式的 Loki,在安装之前记得将前面章节安装的 Loki 相关服务删除。
首先获取微服务模式的 Chart 包:
$ helm repo add grafana https://grafana.github.io/helm-charts
$ helm pull grafana/loki-distributed --untar --version 0.48.4
$ cd loki-simple-scalable该 Chart 包支持下表中显示的组件,Ingester、distributor、querier 和 query-frontend 组件是始终安装的,其他组件是可选的。
| 组件 | 可选 | 默认开启? |
|---|---|---|
| gateway | ✅ | ✅ |
| ingester | ❎ | n/a |
| distributor | ❎ | n/a |
| querier | ❎ | n/a |
| query-frontend | ❎ | n/a |
| table-manager | ✅ | ❎ |
| compactor | ✅ | ❎ |
| ruler | ✅ | ❎ |
| index-gateway | ✅ | ❎ |
| memcached-chunks | ✅ | ❎ |
| memcached-frontend | ✅ | ❎ |
| memcached-index-queries | ✅ | ❎ |
| memcached-index-writes | ✅ | ❎ |
该 Chart 包在微服务模式下配置 Loki,已经过测试,可以与 boltdb-shipper 和 memberlist 一起使用,而其他存储和发现选项也可以使用,但是,该图表不支持设置 Consul 或 Etcd 以进行发现,它们需要进行单独配置,相反,可以使用不需要单独的键/值存储的 memberlist。
默认情况下该 Chart 包会为成员列表创建了一个 Headless Service,ingester、distributor、querier 和 ruler 是其中的一部分。
安装 minio
比如我们这里使用 memberlist、boltdb-shipper 和 minio 来作存储,由于这个 Chart 包没有包含 minio,所以需要我们先单独安装 minio:
#$ helm repo add minio https://helm.min.io/
#$ helm pull minio/minio --untar --version 8.0.10
$ helm repo add bitnami https://charts.bitnami.com/bitnami
$ helm pull bitnami/minio --version 11.10.26

helm pull bitnami/minio --version 12.8.12


$ cd minio创建 Minio 身份验证 secret
kubectl create secret generic minio-secret -n loki-distributed \
  --from-literal=root-user=admin \
--from-literal=root-password=3bed539b361bc02e创建一个如下所示的 values 文件:
# Copyright VMware, Inc.
# SPDX-License-Identifier: APACHE-2.0
## @section Global parameters
## Global Docker image parameters
## Please, note that this will override the image parameters, including dependencies, configured to use the global value
## Current available global Docker image parameters: imageRegistry, imagePullSecrets and storageClass
## @param global.imageRegistry Global Docker image registry
## @param global.imagePullSecrets Global Docker registry secret names as an array
## @param global.storageClass Global StorageClass for Persistent Volume(s)
##
global:
imageRegistry: ""
## e.g.
## imagePullSecrets:
## - myRegistryKeySecretName
##
imagePullSecrets: []
storageClass: ""
## @section Common parameters
## @param nameOverride String to partially override common.names.fullname template (will maintain the release name)
##
nameOverride: ""
## @param fullnameOverride String to fully override common.names.fullname template
##
fullnameOverride: ""
## @param commonLabels Labels to add to all deployed objects
##
commonLabels: {}
## @param commonAnnotations Annotations to add to all deployed objects
##
commonAnnotations: {}
## @param kubeVersion Force target Kubernetes version (using Helm capabilities if not set)
##
kubeVersion: ""
## @param clusterDomain Default Kubernetes cluster domain
##
clusterDomain: cluster.local
## @param extraDeploy Array of extra objects to deploy with the release
##
extraDeploy: []
## @section MinIO® parameters
## Bitnami MinIO® image version
## ref: https://hub.docker.com/r/bitnami/minio/tags/
## @param image.registry MinIO® image registry
## @param image.repository MinIO® image repository
## @param image.tag MinIO® image tag (immutable tags are recommended)
## @param image.digest MinIO® image digest in the way sha256:aa.... Please note this parameter, if set, will override the tag
## @param image.pullPolicy Image pull policy
## @param image.pullSecrets Specify docker-registry secret names as an array
## @param image.debug Specify if debug logs should be enabled
##
image:
registry: registry.cn-beijing.aliyuncs.com
repository: xxk8s/minio
tag: 2023.9.30-debian-11-r2
digest: ""
## Specify a imagePullPolicy
## Defaults to 'Always' if image tag is 'latest', else set to 'IfNotPresent'
## ref: https://kubernetes.io/docs/user-guide/images/#pre-pulling-images
##
pullPolicy: IfNotPresent
## Optionally specify an array of imagePullSecrets.
## Secrets must be manually created in the namespace.
## ref: https://kubernetes.io/docs/tasks/configure-pod-container/pull-image-private-registry/
## e.g:
## pullSecrets:
## - myRegistryKeySecretName
##
pullSecrets: []
## Set to true if you would like to see extra information on logs
##
debug: false
## Bitnami MinIO® Client image version
## ref: https://hub.docker.com/r/bitnami/minio-client/tags/
## @param clientImage.registry MinIO® Client image registry
## @param clientImage.repository MinIO® Client image repository
## @param clientImage.tag MinIO® Client image tag (immutable tags are recommended)
## @param clientImage.digest MinIO® Client image digest in the way sha256:aa.... Please note this parameter, if set, will override the tag
##
clientImage:
registry: registry.cn-beijing.aliyuncs.com
repository: xxk8s/minio-client
tag: 2023.9.29-debian-11-r2
digest: ""
## @param mode MinIO® server mode (`standalone` or `distributed`)
## ref: https://docs.minio.io/docs/distributed-minio-quickstart-guide
##
## MinIO 有两种主要的运行模式:standalone 单实例模式 和 distributed 分布式模式
mode: standalone
## MinIO® authentication parameters
## 身份验证设置
auth:
## @param auth.rootUser MinIO® root username
##
rootUser: admin
## @param auth.rootPassword Password for MinIO® root user
##
rootPassword: ""
## @param auth.existingSecret Use existing secret for credentials details (`auth.rootUser` and `auth.rootPassword` will be ignored and picked up from this secret). The secret has to contain the keys `root-user` and `root-password`)
## 使用这个选项后,auth.rootUser 和 auth.rootPassword 会被忽略,认证信息会从这个 Secret 中获取。该 Secret 需要包含 root-user 和 root-password 这两个键。
existingSecret: "minio-secret"
## @param auth.forcePassword Force users to specify required passwords
## 强制使用密码
forcePassword: false
## @param auth.useCredentialsFiles Mount credentials as a files instead of using an environment variable
## MinIO 的认证信息(用户名和密码)将被作为文件挂载到容器中,而不是通过环境变量传递。
useCredentialsFiles: false
## @param auth.forceNewKeys Force root credentials (user and password) to be reconfigured every time they change in the secrets
## 每次 Kubernetes Secret 中的根用户凭据(用户名和密码)发生变化时,MinIO 的根用户凭据都会被重新配置。
forceNewKeys: true
## @param defaultBuckets Comma, semi-colon or space separated list of buckets to create at initialization (only in standalone mode)
## e.g:
## defaultBuckets: "my-bucket, my-second-bucket"
## 默认的存储桶配置,指定在 MinIO 启动时自动创建的存储桶(buckets)。多个存储桶可以用逗号分隔。
## 这里创建用于loki的buckets
defaultBuckets: "chunks,ruler,admin"
## @param disableWebUI Disable MinIO® Web UI
## ref: https://github.com/minio/minio/tree/master/docs/config/#browser
## 禁用 MinIO 的 Web UI(浏览器界面)。如果设置为 true,用户将无法通过浏览器访问 MinIO 的图形界面。
disableWebUI: false
## Enable tls in front of MinIO® containers.
## 启用或禁用 MinIO 的 TLS
tls:
## @param tls.enabled Enable tls in front of the container
##
enabled: false
## @param tls.autoGenerated Generate automatically self-signed TLS certificates
## MinIO 将自动生成自签名的 TLS 证书。
autoGenerated: false
## @param tls.existingSecret Name of an existing secret holding the certificate information
## 如果你已经有一个包含 TLS 证书的 Kubernetes Secret,可以在这里指定 Secret 的名称。这样,MinIO 将使用这个 Secret 中的证书。
existingSecret: ""
## @param tls.mountPath The mount path where the secret will be located
## Custom mount path where the certificates will be located, if empty will default to /certs
## 指定证书在容器内的挂载路径。
mountPath: ""
## @param extraEnvVars Extra environment variables to be set on MinIO® container
## 为 MinIO 容器设置额外的环境变量。
## e.g:
## extraEnvVars:
## - name: FOO
## value: "bar"
##
extraEnvVars: []
## @param extraEnvVarsCM ConfigMap with extra environment variables
## 指定一个包含额外环境变量的 ConfigMap 的名称
extraEnvVarsCM: ""
## @param extraEnvVarsSecret Secret with extra environment variables
##
extraEnvVarsSecret: ""
## @param command Default container command (useful when using custom images). Use array form
## 指定一个包含额外环境变量的 Secret 的名称
command: []
## @param args Default container args (useful when using custom images). Use array form
## 用于覆盖 MinIO 容器的默认启动命令
args: []
## 用于覆盖 MinIO 容器的默认启动参数。通常与 command 一起使用,用于提供命令的参数,格式为数组。
## @section MinIO® deployment/statefulset parameters
## @param schedulerName Specifies the schedulerName, if it's nil uses kube-scheduler
## https://kubernetes.io/docs/tasks/administer-cluster/configure-multiple-schedulers/
##
schedulerName: ""
## 指定 Kubernetes 调度器的名称
## 如果你使用自定义调度器而不是默认的调度器,可以在这里指定调度器的名称。
## @param terminationGracePeriodSeconds In seconds, time the given to the MinIO pod needs to terminate gracefully
## ref: https://kubernetes.io/docs/concepts/workloads/pods/pod/#termination-of-pods
## 定义在 Pod 终止时 Kubernetes 应该等待的时间,以便 Pod 可以优雅地关闭。这个时间通常用于确保正在处理的请求或操作可以在终止前完成。
## 未指定,使用 Kubernetes 的默认值,通常是 30 秒
terminationGracePeriodSeconds: ""
## MinIO® deployment parameters
## Only when 'mode' is 'standalone'
## standalone 模式下以 Deployment 方式部署时的参数,仅在 standalone 模式下适用
deployment:
## @param deployment.updateStrategy.type Deployment strategy type
## ref: https://kubernetes.io/docs/concepts/workloads/controllers/statefulset/#update-strategies
## e.g:
## 指定 Deployment 的更新策略类型
## updateStrategy:
## type: RollingUpdate
## rollingUpdate:
## maxSurge: 25%
## maxUnavailable: 25%
##
updateStrategy:
type: Recreate
## MinIO® statefulset parameters
## Only when mode is 'distributed'
## 仅在 distributed 模式下适用
statefulset:
## @param statefulset.updateStrategy.type StatefulSet strategy type
## ref: https://kubernetes.io/docs/concepts/workloads/controllers/statefulset/#update-strategies
## e.g:
## updateStrategy:
## type: RollingUpdate
## rollingUpdate:
## maxSurge: 25%
## maxUnavailable: 25%
##
updateStrategy:
type: RollingUpdate
## @param statefulset.podManagementPolicy StatefulSet controller supports relax its ordering guarantees while preserving its uniqueness and identity guarantees. There are two valid pod management policies: OrderedReady and Parallel
## ref: https://kubernetes.io/docs/tutorials/stateful-application/basic-stateful-set/#pod-management-policy
##定义 StatefulSet 的 Pod 管理策略。
## 可以选择 OrderedReady 或 Parallel。OrderedReady 会按顺序启动 Pod,确保前一个 Pod 准备好后再启动下一个;而 Parallel 会并行启动所有 Pod。
podManagementPolicy: Parallel
## @param statefulset.replicaCount Number of pods per zone (only for MinIO® distributed mode). Should be even and `>= 4`
## 在 distributed 模式下,定义每个 zone 中的 Pod 数量。建议设置为偶数且不小于 4,以确保数据的高可用性和冗余。
replicaCount: 4
## @param statefulset.zones Number of zones (only for MinIO® distributed mode)
## 指定 MinIO 集群的 zone 数量。zone 是独立的故障域,可以用来增加数据的可用性和容错能力。
zones: 1
## @param statefulset.drivesPerNode Number of drives attached to every node (only for MinIO® distributed mode)
## 指定每个节点上挂载的驱动器数量
drivesPerNode: 1
## MinIO® provisioning
## MinIO 预配置(provisioning)Job
provisioning:
## @param provisioning.enabled Enable MinIO® provisioning Job
## 该选项用于启用或禁用 MinIO 预配置 Job。如果设置为 true
## 在 MinIO 服务启动前,Kubernetes 会创建一个 Job 来执行预配置任务。
enabled: false
## @param provisioning.schedulerName Name of the k8s scheduler (other than default) for MinIO® provisioning
## ref: https://kubernetes.io/docs/tasks/administer-cluster/configure-multiple-schedulers/
## 指定用于 MinIO 预配置 Pod 的调度器名称
schedulerName: ""
## @param provisioning.podLabels Extra labels for provisioning pods
## Ref: https://kubernetes.io/docs/concepts/overview/working-with-objects/labels/
## 为预配置 Pod 添加额外的标签(labels)
podLabels: {}
## @param provisioning.podAnnotations Provisioning Pod annotations.
## 为预配置 Pod 添加额外的注解
podAnnotations: {}
## @param provisioning.command Default provisioning container command (useful when using custom images). Use array form
## 用于覆盖预配置容器的默认启动命令
command: []
## @param provisioning.args Default provisioning container args (useful when using custom images). Use array form
## 用于覆盖预配置容器的默认启动参数
args: []
## @param provisioning.extraCommands Optionally specify extra list of additional commands for MinIO® provisioning pod
## 允许你为 MinIO 预配置 Pod 指定额外的命令列表。
extraCommands: []
## @param provisioning.extraVolumes Optionally specify extra list of additional volumes for MinIO® provisioning pod
## 为 MinIO 预配置 Pod 添加额外的卷
extraVolumes: []
## @param provisioning.extraVolumeMounts Optionally specify extra list of additional volumeMounts for MinIO® provisioning container
## 为 MinIO 预配置容器添加额外的卷挂载
extraVolumeMounts: []
## We usually recommend not to specify default resources and to leave this as a conscious
## choice for the user. This also increases chances charts run on environments with little
## resources, such as Minikube. If you do want to specify resources, uncomment the following
## lines, adjust them as necessary, and remove the curly braces after 'resources:'.
## @param provisioning.resources.limits The resources limits for the container
## @param provisioning.resources.requests The requested resources for the container
## 定义预配置 Job 容器的资源请求和限制
resources:
## Example:
## limits:
## cpu: 100m
## memory: 64Mi
limits: {}
## Examples:
## requests:
## cpu: 200m
## memory: 128Mi
requests: {}
#################################################################
## 预配置 MinIO 的策略
## @param provisioning.policies MinIO® policies provisioning
## 定义一个或多个策略,每个策略包含对特定资源的访问权限。这些策略可以应用于用户或组,控制他们对存储桶和对象的访问权限。
## https://docs.min.io/docs/minio-admin-complete-guide.html#policy
## e.g.
## 这个示例中定义了一个名为 custom-bucket-specific-policy 的策略,授予对 my-bucket 及其对象的特定操作权限。
## policies:
## - name: custom-bucket-specific-policy
## statements:
## - resources:
## - "arn:aws:s3:::my-bucket"
## actions:
## - "s3:GetBucketLocation"
## - "s3:ListBucket"
## - "s3:ListBucketMultipartUploads"
## - resources:
## - "arn:aws:s3:::my-bucket/*"
## # Allowed values: "Allow" | "Deny"
## # Defaults to "Deny" if not specified
## effect: "Allow"
## actions:
## - "s3:AbortMultipartUpload"
## - "s3:DeleteObject"
## - "s3:GetObject"
## - "s3:ListMultipartUploadParts"
## - "s3:PutObject"
policies: []
#################################################################
## @param provisioning.users MinIO® users provisioning. Can be used in addition to provisioning.usersExistingSecrets.
## https://docs.min.io/docs/minio-admin-complete-guide.html#user
## e.g.
## 在这个示例中,定义了一个名为 test-username 的用户,分配了多个策略。
## users:
## - username: test-username
## password: test-password
## disabled: false
## policies:
## - readwrite
## - consoleAdmin
## - diagnostics
## # When set to true, it will replace all policies with the specified.
## # When false, the policies will be added to the existing.
## setPolicies: false
## 这个字段用于预配置 MinIO 用户。你可以定义多个用户,每个用户可以指定密码、是否禁用以及要分配的策略。
users: []
#################################################################
## @param provisioning.usersExistingSecrets Array if existing secrets containing MinIO® users to be provisioned. Can be used in addition to provisioning.users.
## https://docs.min.io/docs/minio-admin-complete-guide.html#user
##
## Instead of configuring users inside values.yaml, referring to existing Kubernetes secrets containing user
## configurations is possible.
## e.g.
## usersExistingSecrets:
## - centralized-minio-users
##
## All provided Kubernetes secrets require a specific data structure. The same data from the provisioning.users example above
## can be defined via secrets with the following data structure. The secret keys have no meaning to the provisioning job except that
## they are used as filenames.
## 通过 Kubernetes Secret 管理用户配置需要注意的是,Secret 的数据结构必须符合 MinIO 的要求。
## ## apiVersion: v1
## ## kind: Secret
## ## metadata:
## ## name: centralized-minio-users
## ## type: Opaque
## ## stringData:
## ## username1: |
## ## username=test-username
## ## password=test-password
## ## disabled=false
## ## policies=readwrite,consoleAdmin,diagnostics
## ## setPolicies=false
usersExistingSecrets: []
#################################################################
#################################################################
## 预配置 MinIO 组。组可以包含多个成员,并且可以分配特定的策略。
## 这个示例定义了一个名为 test-group 的组,并将 test-username 用户添加为该组的成员。
## @param provisioning.groups MinIO® groups provisioning
## https://docs.min.io/docs/minio-admin-complete-guide.html#group
## e.g.
## groups
## - name: test-group
## disabled: false
## members:
## - test-username
## policies:
## - readwrite
## # When set to true, it will replace all policies with the specified.
## # When false, the policies will be added to the existing.
## setPolicies: false
groups: []
#################################################################
#################################################################
## 预先创建和配置 MinIO 的存储桶。
## 你可以指定存储桶的区域、版本控制、生命周期规则、配额和标签等。
## @param provisioning.buckets MinIO® buckets, versioning, lifecycle, quota and tags provisioning
## Buckets https://docs.min.io/docs/minio-client-complete-guide.html#mb
## Lifecycle https://docs.min.io/docs/minio-client-complete-guide.html#ilm
## Quotas https://docs.min.io/docs/minio-admin-complete-guide.html#bucket
## Tags https://docs.min.io/docs/minio-client-complete-guide.html#tag
## Versioning https://docs.min.io/docs/minio-client-complete-guide.html#version
## e.g.
## 这个示例定义了一个名为 test-bucket 的存储桶,指定了生命周期、配额和标签等配置。
## buckets:
## - name: test-bucket
## region: us-east-1
## # Only when mode is 'distributed'
## # ref: https://docs.minio.io/docs/distributed-minio-quickstart-guide
## versioning: false
## # Versioning is automatically enabled if withLock is true
## # ref: https://docs.min.io/docs/minio-bucket-versioning-guide.html
## withLock: true
## # Only when mode is 'distributed'
## # ref: https://docs.minio.io/docs/distributed-minio-quickstart-guide
## lifecycle:
## - id: TestPrefix7dRetention
## prefix: test-prefix
## disabled: false
## expiry:
## days: 7
## # Days !OR! date
## # date: "2021-11-11T00:00:00Z"
## nonconcurrentDays: 3
## # Only when mode is 'distributed'
## # ref: https://docs.minio.io/docs/distributed-minio-quickstart-guide
## quota:
## # set (hard still works as an alias but is deprecated) or clear(+ omit size)
## type: set
## size: 10GiB
## tags:
## key1: value1
buckets: []
#################################################################
##通过预配置来设置 MinIO 服务器的配置项。你可以指定多个配置项,例如区域名称。
## @param provisioning.config MinIO® config provisioning
## https://docs.min.io/docs/minio-server-configuration-guide.html
## e.g.
## 这个示例定义了一个配置项,用于设置 MinIO 的区域名称为 us-east-1。
## config:
## - name: region
## options:
## name: us-east-1
config: []
#################################################################
## MinIO 的 Pod 和容器的安全上下文
## MinIO® pod Security Context
## 配置 Pod 的安全上下文,这是应用于整个 Pod 的安全设置。
## ref: https://kubernetes.io/docs/tasks/configure-pod-container/security-context/#set-the-security-context-for-a-pod
## @param provisioning.podSecurityContext.enabled Enable pod Security Context
## @param provisioning.podSecurityContext.fsGroup Group ID for the container
##
podSecurityContext:
enabled: true
fsGroup: 1001
## 配置容器级别的安全上下文,它定义了容器运行时的安全属性,如用户 ID 和是否必须以非 root 用户运行。
## MinIO® container Security Context
## ref: https://kubernetes.io/docs/tasks/configure-pod-container/security-context/#set-the-security-context-for-a-container
## @param provisioning.containerSecurityContext.enabled Enable container Security Context
## @param provisioning.containerSecurityContext.runAsUser User ID for the container
## @param provisioning.containerSecurityContext.runAsNonRoot Avoid running as root User
## 设置为 1001 则容器内的进程将以用户 1001 运行,而不是默认的 root 用户。
## 强制容器以非 root 用户运行。
containerSecurityContext:
enabled: true
runAsUser: 1001
runAsNonRoot: true
## 配置 MinIO 预配置 Job 完成后的自动清理策略。
## Automatic Cleanup for Finished Jobs
## @param provisioning.cleanupAfterFinished.enabled Enables Cleanup for Finished Jobs
## @param provisioning.cleanupAfterFinished.seconds Sets the value of ttlSecondsAfterFinished
## ref: https://kubernetes.io/docs/concepts/workloads/controllers/ttlafterfinished/
## 设置 Job 完成后保留的时间(秒)。设置为 600 则表示 Job 在完成 10 分钟后将被清理。
cleanupAfterFinished:
enabled: false
seconds: 600
## 允许在 Pod 的 /etc/hosts 文件中添加自定义主机别名
## @param hostAliases MinIO® pod host aliases
## https://kubernetes.io/docs/concepts/services-networking/add-entries-to-pod-etc-hosts-with-host-aliases/
##
hostAliases: []
## @param containerPorts.api MinIO® container port to open for MinIO® API
## @param containerPorts.console MinIO® container port to open for MinIO® Console
## 定义 MinIO 容器要开放的端口,用于 API 和控制台的访问。
containerPorts:
api: 9000
console: 9001
## 注意!这块已经不是定义预配置pod的参数
## 定义了 MinIO 在 Kubernetes 中运行时的安全上下文
## MinIO® pod Security Context
## ref: https://kubernetes.io/docs/tasks/configure-pod-container/security-context/#set-the-security-context-for-a-pod
## @param podSecurityContext.enabled Enable pod Security Context
## @param podSecurityContext.fsGroup Group ID for the container
## 这个配置项用于设置 Pod 级别的安全上下文,影响整个 Pod 中所有容器的运行行为。
## 这个设置会将文件系统的组 ID 设置为 1001,确保所有容器对挂载的卷具有适当的组权限。
podSecurityContext:
enabled: true
fsGroup: 1001
## MinIO® container Security Context
## ref: https://kubernetes.io/docs/tasks/configure-pod-container/security-context/#set-the-security-context-for-a-container
## @param containerSecurityContext.enabled Enable container Security Context
## @param containerSecurityContext.runAsUser User ID for the container
## @param containerSecurityContext.runAsNonRoot Avoid running as root User
##
containerSecurityContext:
enabled: true
runAsUser: 1001
runAsNonRoot: true
## @param podLabels Extra labels for MinIO® pods
## Ref: https://kubernetes.io/docs/concepts/overview/working-with-objects/labels/
## 定义要应用于 MinIO Pod 的自定义标签
podLabels: {}
## @param podAnnotations Annotations for MinIO® pods
## ref: https://kubernetes.io/docs/concepts/overview/working-with-objects/annotations/
## 为 MinIO Pod 添加注解
podAnnotations: {}
## @param podAffinityPreset Pod affinity preset. Ignored if `affinity` is set. Allowed values: `soft` or `hard`
## ref: https://kubernetes.io/docs/concepts/scheduling-eviction/assign-pod-node/#inter-pod-affinity-and-anti-affinity
## 预设的 Pod 亲和性选项
podAffinityPreset: ""
## 预设的 Pod 反亲和性选项,定义 MinIO Pod 与其他 Pod 的反亲和性(anti-affinity)策略,通常用于确保 Pod 分散在不同的节点上。soft(软反亲和性)
## @param podAntiAffinityPreset Pod anti-affinity preset. Ignored if `affinity` is set. Allowed values: `soft` or `hard`
## ref: https://kubernetes.io/docs/concepts/scheduling-eviction/assign-pod-node/#inter-pod-affinity-and-anti-affinity
##
podAntiAffinityPreset: soft
## 节点亲和性预设选项,定义 MinIO Pod 应该被调度到哪些具有特定标签的节点上。
## Node affinity preset
## 允许值为 soft 或 hard。soft 表示软约束,hard 表示硬约束。
## ref: https://kubernetes.io/docs/concepts/scheduling-eviction/assign-pod-node/#node-affinity
## key: 节点标签的键。
## values: 节点标签的值列表。
nodeAffinityPreset:
## @param nodeAffinityPreset.type Node affinity preset type. Ignored if `affinity` is set. Allowed values: `soft` or `hard`
##
type: ""
## @param nodeAffinityPreset.key Node label key to match. Ignored if `affinity` is set.
## E.g.
## key: "kubernetes.io/e2e-az-name"
##
key: ""
## @param nodeAffinityPreset.values Node label values to match. Ignored if `affinity` is set.
## E.g.
## values:
## - e2e-az1
## - e2e-az2
##
values: []
## 自定义的 Pod 亲和性和反亲和性规则。
## 如果设置了此项,podAffinityPreset、podAntiAffinityPreset 和 nodeAffinityPreset 将被忽略。
## @param affinity Affinity for pod assignment. Evaluated as a template.
## ref: https://kubernetes.io/docs/concepts/configuration/assign-pod-node/#affinity-and-anti-affinity
## Note: podAffinityPreset, podAntiAffinityPreset, and nodeAffinityPreset will be ignored when it's set
##
affinity: {}
## @param nodeSelector Node labels for pod assignment. Evaluated as a template.
## ref: https://kubernetes.io/docs/user-guide/node-selection/
##用于选择特定节点运行 MinIO Pod
nodeSelector: {}
## @param tolerations Tolerations for pod assignment. Evaluated as a template.
## ref: https://kubernetes.io/docs/concepts/configuration/taint-and-toleration/
##定义容忍污点(taints)的策略
tolerations: []
## @param topologySpreadConstraints Topology Spread Constraints for MinIO® pods assignment spread across your cluster among failure-domains
## Ref: https://kubernetes.io/docs/concepts/workloads/pods/pod-topology-spread-constraints/#spread-constraints-for-pods
## 用于定义拓扑分布约束
topologySpreadConstraints: []
## @param priorityClassName MinIO® pods' priorityClassName
## 为 MinIO Pod 设置优先级类
priorityClassName: ""
## MinIO® containers' resource requests and limits
## ref: https://kubernetes.io/docs/user-guide/compute-resources/
## We usually recommend not to specify default resources and to leave this as a conscious
## choice for the user. This also increases chances charts run on environments with little
## resources, such as Minikube. If you do want to specify resources, uncomment the following
## lines, adjust them as necessary, and remove the curly braces after 'resources:'.
## @param resources.limits The resources limits for the MinIO® container
## @param resources.requests The requested resources for the MinIO® container
## 配置 MinIO 容器的资源请求和限制
resources:
## Example:
## limits:
## cpu: 250m
## memory: 256Mi
limits:
cpu: 1000m
memory: 2048Mi
## Examples:
## requests:
## cpu: 250m
## memory: 256Mi
requests:
cpu: 500m
memory: 1024Mi
## Liveness 探针用于检查容器是否处于健康状态。如果探针失败,Kubernetes 将重启容器。
## Configure extra options for liveness probe
## ref: https://kubernetes.io/docs/tasks/configure-pod-container/configure-liveness-readiness-probes/#configure-probes
## @param livenessProbe.enabled Enable livenessProbe
## @param livenessProbe.initialDelaySeconds Initial delay seconds for livenessProbe
## @param livenessProbe.periodSeconds Period seconds for livenessProbe
## @param livenessProbe.timeoutSeconds Timeout seconds for livenessProbe
## @param livenessProbe.failureThreshold Failure threshold for livenessProbe
## @param livenessProbe.successThreshold Success threshold for livenessProbe
##
livenessProbe:
enabled: true
initialDelaySeconds: 5
periodSeconds: 5
timeoutSeconds: 5
successThreshold: 1
failureThreshold: 5
## Configure extra options for readiness probe
## ref: https://kubernetes.io/docs/tasks/configure-pod-container/configure-liveness-readiness-probes/#configure-probes
## @param readinessProbe.enabled Enable readinessProbe
## @param readinessProbe.initialDelaySeconds Initial delay seconds for readinessProbe
## @param readinessProbe.periodSeconds Period seconds for readinessProbe
## @param readinessProbe.timeoutSeconds Timeout seconds for readinessProbe
## @param readinessProbe.failureThreshold Failure threshold for readinessProbe
## @param readinessProbe.successThreshold Success threshold for readinessProbe
## Readiness 探针用于检查容器是否已准备好接受流量。如果探针失败,Pod 将不会被加入服务的负载均衡。
readinessProbe:
enabled: true
initialDelaySeconds: 5
periodSeconds: 5
timeoutSeconds: 1
successThreshold: 1
failureThreshold: 5
## Startup 探针用于在容器启动时进行检查。它适合用于启动时间较长的应用程序,帮助区分应用程序是启动慢还是无法启动。
## Configure extra options for startupProbe probe
## ref: https://kubernetes.io/docs/tasks/configure-pod-container/configure-liveness-readiness-probes/#configure-probes
## @param startupProbe.enabled Enable startupProbe
## @param startupProbe.initialDelaySeconds Initial delay seconds for startupProbe
## @param startupProbe.periodSeconds Period seconds for startupProbe
## @param startupProbe.timeoutSeconds Timeout seconds for startupProbe
## @param startupProbe.failureThreshold Failure threshold for startupProbe
## @param startupProbe.successThreshold Success threshold for startupProbe
##
startupProbe:
enabled: false
initialDelaySeconds: 0
periodSeconds: 10
timeoutSeconds: 5
successThreshold: 1
failureThreshold: 60
## @param customLivenessProbe Override default liveness probe
## 自定义这些探针,而不是使用默认配置。可以在这里完全覆盖默认探针设置。
customLivenessProbe: {}
## @param customReadinessProbe Override default readiness probe
##为 MinIO Pod 和容器添加额外的卷和卷挂载
customReadinessProbe: {}
## @param customStartupProbe Override default startup probe
##
customStartupProbe: {}
## @param lifecycleHooks for the MinIO® container(s) to automate configuration before or after startup
## 定义 MinIO 容器的生命周期钩子。生命周期钩子允许在容器启动前或停止后执行特定操作,比如进行配置或清理任务。
lifecycleHooks: {}
## @param extraVolumes Optionally specify extra list of additional volumes for MinIO® pods
##
extraVolumes: []
## @param extraVolumeMounts Optionally specify extra list of additional volumeMounts for MinIO® container(s)
##
extraVolumeMounts: []
## @param initContainers Add additional init containers to the MinIO® pods
## e.g:
## initContainers:
## - name: your-image-name
## image: your-image
## imagePullPolicy: Always
## ports:
## - name: portname
## containerPort: 1234
## 为 MinIO Pod 配置额外的初始化容器。
initContainers: []
## @param sidecars Add additional sidecar containers to the MinIO® pods
## e.g:
## sidecars:
## - name: your-image-name
## image: your-image
## imagePullPolicy: Always
## ports:
## - name: portname
## containerPort: 1234
## 为 MinIO Pod 配置额外的 sidecar 容器
## 这些容器与 MinIO 容器一起运行,通常用于执行辅助功能,如日志收集或代理服务。
sidecars: []
## MinIO 服务的暴露方式
## @section Traffic exposure parameters
## MinIO® Service properties
## 定义 Kubernetes Service 的类型
service:
## @param service.type MinIO® service type
##
type: NodePort
## @param service.ports.api MinIO® API service port
## @param service.ports.console MinIO® Console service port
## 定义 MinIO 服务的端口。
ports:
api: 9000
console: 9001
## @param service.nodePorts.api Specify the MinIO® API nodePort value for the LoadBalancer and NodePort service types
## @param service.nodePorts.console Specify the MinIO® Console nodePort value for the LoadBalancer and NodePort service types
## ref: https://kubernetes.io/docs/concepts/services-networking/service/#type-nodeport
## 当 service.type 设置为 NodePort 或 LoadBalancer 时,定义 MinIO API 和控制台的 NodePort 端口号。如果不指定,Kubernetes 将自动分配端口。
nodePorts:
api: "31390"
console: "31391"
## @param service.clusterIP Service Cluster IP
## e.g.:
## clusterIP: None
## 手动设置 Service 的 Cluster IP 地址。如果不设置,Kubernetes 会自动分配一个 IP。可以设置为 None 以创建一个无头服务(headless service)。
clusterIP: ""
## @param service.loadBalancerIP loadBalancerIP if service type is `LoadBalancer` (optional, cloud specific)
## ref: https://kubernetes.io/docs/user-guide/services/#type-loadbalancer
## 当 service.type 为 LoadBalancer 时,可以指定一个固定的 IP 地址。这个配置在某些云提供商环境中很有用,允许你指定负载均衡器的外部 IP。
loadBalancerIP: ""
## @param service.loadBalancerSourceRanges Addresses that are allowed when service is LoadBalancer
## https://kubernetes.io/docs/tasks/access-application-cluster/configure-cloud-provider-firewall/#restrict-access-for-loadbalancer-service
## e.g:
## loadBalancerSourceRanges:
## - 10.10.10.0/24
## 当 service.type 为 LoadBalancer 时,定义允许访问此服务的 IP 地址范围。这可以用来限制哪些 IP 可以通过负载均衡器访问 MinIO。
loadBalancerSourceRanges: []
## @param service.externalTrafficPolicy Enable client source IP preservation
## ref https://kubernetes.io/docs/tasks/access-application-cluster/create-external-load-balancer/#preserving-the-client-source-ip
## 当 service.type 为 LoadBalancer 或 NodePort 时,指定是否保留客户端的源 IP 地址。
externalTrafficPolicy: Cluster
## @param service.extraPorts Extra ports to expose in the service (normally used with the `sidecar` value)
##允许你在 MinIO 服务中暴露额外的端口,通常用于 sidecar 容器的额外服务。
extraPorts: []
## @param service.annotations Annotations for MinIO® service
## This can be used to set the LoadBalancer service type to internal only.
## ref: https://kubernetes.io/docs/concepts/services-networking/service/#internal-load-balancer
## 为 MinIO 服务添加 Kubernetes 注解
annotations: {}
## Headless service properties
## 定义 MinIO 的无头服务(Headless Service)配置。无头服务不分配 Cluster IP,但仍然可以通过 DNS 解析 Pod 的 IP 地址。
headless:
## @param service.headless.annotations Annotations for the headless service.
## 为无头服务添加注解
annotations: {}
## MinIO 控制台的 Ingress 资源配置
## Configure the ingress resource that allows you to access the
## MinIO® Console. Set up the URL
## ref: https://kubernetes.io/docs/user-guide/ingress/
## 启用或禁用 Ingress 资源。
ingress:
## @param ingress.enabled Enable ingress controller resource for MinIO Console
##
enabled: false
## @param ingress.apiVersion Force Ingress API version (automatically detected if not set)
##强制指定 Ingress 资源的 API 版本。如果不设置,Helm 会自动检测 Kubernetes 版本并选择合适的 API 版本。
apiVersion: ""
## 指定 IngressClass,用于定义 Ingress 控制器的行为。如果集群中有多个 IngressClass,必须指定此字段。
## @param ingress.ingressClassName IngressClass that will be be used to implement the Ingress (Kubernetes 1.18+)
## This is supported in Kubernetes 1.18+ and required if you have more than one IngressClass marked as the default for your cluster.
## ref: https://kubernetes.io/blog/2020/04/02/improvements-to-the-ingress-api-in-kubernetes-1.18/
##
ingressClassName: ""
## 设置 Ingress 资源的主机名,即访问 MinIO 控制台的 URL。
## @param ingress.hostname Default host for the ingress resource
##
hostname: minio.local
## 定义访问 MinIO 控制台的路径。默认情况下,根路径 / 用于访问 MinIO 控制台。
## @param ingress.path The Path to MinIO®. You may need to set this to '/*' in order to use this with ALB ingress controllers.
##
path: /
## 设置 Ingress 路径的类型。常见的选项包括 ImplementationSpecific(默认),Exact(精确匹配),Prefix(路径前缀匹配)。
## @param ingress.pathType Ingress path type
##
pathType: ImplementationSpecific
## 指定 Ingress 资源要代理到的 MinIO 服务端口。默认使用 minio-console,通常对应 9001 端口。
## @param ingress.servicePort Service port to be used
## Default is http. Alternative is https.
##
servicePort: minio-console
## 为 Ingress 资源添加自定义注解(annotations),通常用于配置 Ingress 控制器的行为或集成其他组件,如 cert-manager。
## @param ingress.annotations Additional annotations for the Ingress resource. To enable certificate autogeneration, place here your cert-manager annotations.
## For a full list of possible ingress annotations, please see
## ref: https://github.com/kubernetes/ingress-nginx/blob/master/docs/user-guide/nginx-configuration/annotations.md
## Use this parameter to set the required annotations for cert-manager, see
## ref: https://cert-manager.io/docs/usage/ingress/#supported-annotations
##
## e.g:
## annotations:
## kubernetes.io/ingress.class: nginx
## cert-manager.io/cluster-issuer: cluster-issuer-name
##
annotations: {}
## 启用 TLS 配置,为指定的主机名(ingress.hostname)配置 HTTPS 访问。TLS 证书通常存储在 Kubernetes Secret 中。
## @param ingress.tls Enable TLS configuration for the hostname defined at `ingress.hostname` parameter
## TLS certificates will be retrieved from a TLS secret with name: `{{- printf "%s-tls" .Values.ingress.hostname }}`
## You can:
## - Use the `ingress.secrets` parameter to create this TLS secret
## - Rely on cert-manager to create it by setting the corresponding annotations
## - Rely on Helm to create self-signed certificates by setting `ingress.selfSigned=true`
##
tls: false
## @param ingress.selfSigned Create a TLS secret for this ingress record using self-signed certificates generated by Helm
##使用 Helm 自动生成的自签名证书创建 TLS Secret。这通常用于测试环境。
selfSigned: false
## @param ingress.extraHosts The list of additional hostnames to be covered with this ingress record.
## Most likely the hostname above will be enough, but in the event more hosts are needed, this is an array
## e.g:
## extraHosts:
## - name: minio.local
## path: /
## 除了 ingress.hostname 外,添加更多需要被此 Ingress 资源覆盖的主机名。
extraHosts: []
## 添加额外的路径规则到 Ingress 资源。这些路径将被应用到主机名下的特定路径,如处理 SSL 重定向等。
## @param ingress.extraPaths Any additional paths that may need to be added to the ingress under the main host
## For example: The ALB ingress controller requires a special rule for handling SSL redirection.
## extraPaths:
## - path: /*
## backend:
## serviceName: ssl-redirect
## servicePort: use-annotation
##
extraPaths: []
## @param ingress.extraTls The tls configuration for additional hostnames to be covered with this ingress record.
## see: https://kubernetes.io/docs/concepts/services-networking/ingress/#tls
## e.g:
## extraTls:
## - hosts:
## - minio.local
## secretName: minio.local-tls
##为额外的主机名配置 TLS 设置。通常用于同一个 Ingress 资源需要处理多个主机名的情况。
extraTls: []
## 如果你想手动提供 TLS 证书,可以通过这个配置项来指定这些证书。证书和密钥需要以 PEM 格式提供。
## @param ingress.secrets If you're providing your own certificates, please use this to add the certificates as secrets
## key and certificate are expected in PEM format
## name should line up with a secretName set further up
##
## If it is not set and you're using cert-manager, this is unneeded, as it will create a secret for you with valid certificates
## If it is not set and you're NOT using cert-manager either, self-signed certificates will be created valid for 365 days
## It is also possible to create and manage the certificates outside of this helm chart
## Please see README.md for more information
##
## Example
## secrets:
## - name: minio.local-tls
## key: ""
## certificate: ""
##
secrets: []
## 添加额外的 Ingress 规则,用于覆盖默认的规则设置,适用于更加复杂的 Ingress 配置需求。
## @param ingress.extraRules Additional rules to be covered with this ingress record
## ref: https://kubernetes.io/docs/concepts/services-networking/ingress/#ingress-rules
## e.g:
## extraRules:
## - host: example.local
## http:
## path: /
## backend:
## service:
## name: example-svc
## port:
## name: http
##
extraRules: []
#这个配置类似于之前的 MinIO 控制台,用于 MinIO 的 API 端点的Ingress 配置
## Configure the ingress resource that allows you to access the
## MinIO® API. Set up the URL
## ref: https://kubernetes.io/docs/user-guide/ingress/
##
apiIngress:
## @param apiIngress.enabled Enable ingress controller resource for MinIO API
##
enabled: false
## @param apiIngress.apiVersion Force Ingress API version (automatically detected if not set)
##
apiVersion: ""
## @param apiIngress.ingressClassName IngressClass that will be be used to implement the Ingress (Kubernetes 1.18+)
## This is supported in Kubernetes 1.18+ and required if you have more than one IngressClass marked as the default for your cluster.
## ref: https://kubernetes.io/blog/2020/04/02/improvements-to-the-ingress-api-in-kubernetes-1.18/
##
ingressClassName: ""
## @param apiIngress.hostname Default host for the ingress resource
##
hostname: minio.local
## @param apiIngress.path The Path to MinIO®. You may need to set this to '/*' in order to use this with ALB ingress controllers.
##
path: /
## @param apiIngress.pathType Ingress path type
##
pathType: ImplementationSpecific
## @param apiIngress.servicePort Service port to be used
## Default is http. Alternative is https.
##
servicePort: minio-api
## @param apiIngress.annotations Additional annotations for the Ingress resource. To enable certificate autogeneration, place here your cert-manager annotations.
## For a full list of possible ingress annotations, please see
## ref: https://github.com/kubernetes/ingress-nginx/blob/master/docs/user-guide/nginx-configuration/annotations.md
## Use this parameter to set the required annotations for cert-manager, see
## ref: https://cert-manager.io/docs/usage/ingress/#supported-annotations
##
## e.g:
## annotations:
## kubernetes.io/ingress.class: nginx
## cert-manager.io/cluster-issuer: cluster-issuer-name
##
annotations: {}
## @param apiIngress.tls Enable TLS configuration for the hostname defined at `apiIngress.hostname` parameter
## TLS certificates will be retrieved from a TLS secret with name: `{{- printf "%s-tls" .Values.apiIngress.hostname }}`
## You can:
## - Use the `ingress.secrets` parameter to create this TLS secret
## - Rely on cert-manager to create it by setting the corresponding annotations
## - Rely on Helm to create self-signed certificates by setting `ingress.selfSigned=true`
##
tls: false
## @param apiIngress.selfSigned Create a TLS secret for this ingress record using self-signed certificates generated by Helm
##
selfSigned: false
## @param apiIngress.extraHosts The list of additional hostnames to be covered with this ingress record.
## Most likely the hostname above will be enough, but in the event more hosts are needed, this is an array
## e.g:
## extraHosts:
## - name: minio.local
## path: /
##
extraHosts: []
## @param apiIngress.extraPaths Any additional paths that may need to be added to the ingress under the main host
## For example: The ALB ingress controller requires a special rule for handling SSL redirection.
## extraPaths:
## - path: /*
## backend:
## serviceName: ssl-redirect
## servicePort: use-annotation
##
extraPaths: []
## @param apiIngress.extraTls The tls configuration for additional hostnames to be covered with this ingress record.
## see: https://kubernetes.io/docs/concepts/services-networking/ingress/#tls
## e.g:
## extraTls:
## - hosts:
## - minio.local
## secretName: minio.local-tls
##
extraTls: []
## @param apiIngress.secrets If you're providing your own certificates, please use this to add the certificates as secrets
## key and certificate are expected in PEM format
## name should line up with a secretName set further up
##
## If it is not set and you're using cert-manager, this is unneeded, as it will create a secret for you with valid certificates
## If it is not set and you're NOT using cert-manager either, self-signed certificates will be created valid for 365 days
## It is also possible to create and manage the certificates outside of this helm chart
## Please see README.md for more information
##
## Example
## secrets:
## - name: minio.local-tls
## key: ""
## certificate: ""
##
secrets: []
## @param apiIngress.extraRules Additional rules to be covered with this ingress record
## ref: https://kubernetes.io/docs/concepts/services-networking/ingress/#ingress-rules
## e.g:
## extraRules:
## - host: example.local
## http:
## path: /
## backend:
## service:
## name: example-svc
## port:
## name: http
##
extraRules: []
## 定义NetworkPolicy规则
## 限制哪些 Pod 或 IP 地址可以访问 MinIO 服务
## NetworkPolicy parameters
## 启用或禁用 MinIO 的默认 NetworkPolicy
networkPolicy:
## @param networkPolicy.enabled Enable the default NetworkPolicy policy
##
enabled: false
## @param networkPolicy.allowExternal Don't require client label for connections
## When set to false, only pods with the correct client label will have network access to the port MinIO® is
## listening on. When true, MinIO® will accept connections from any source (with the correct destination port).
## 控制是否允许外部(非特定标签的 Pod)访问 MinIO。如果设置为 false,只有具有特定客户端标签的 Pod 才能访问 MinIO 的服务端口;
## 如果设置为 true,MinIO 将接受来自任何源的连接,只要目标端口正确。
allowExternal: true
## @param networkPolicy.extraFromClauses Allows to add extra 'from' clauses to the NetworkPolicy
## 允许你添加额外的 from 子句到 NetworkPolicy 中,
## 这些子句用于定义哪些 Pod 或 IP 地址可以访问 MinIO 的网络端点。你可以根据需要自定义这些规则,以便更精细地控制网络访问。
extraFromClauses: []
## Example
## extraFromClauses:
## - podSelector:
## matchLabels:
## a: b
##extraFromClauses:
## - podSelector:
## matchLabels:
## role: frontend
## - ipBlock:
## cidr: 192.168.1.0/24
## 启用或禁用 MinIO 的数据持久化。
## @section Persistence parameters
## Enable persistence using Persistent Volume Claims
## ref: https://kubernetes.io/docs/user-guide/persistent-volumes/
##
persistence:
## @param persistence.enabled Enable MinIO® data persistence using PVC. If false, use emptyDir
##
enabled: true
## @param persistence.storageClass PVC Storage Class for MinIO® data volume
## If defined, storageClassName: <storageClass>
## If set to "-", storageClassName: "", which disables dynamic provisioning
## If undefined (the default) or set to null, no storageClassName spec is
## set, choosing the default provisioner. (gp2 on AWS, standard on
## GKE, AWS & OpenStack)
## 指定用于 MinIO 数据卷的存储类
storageClass: "rook-ceph-block-test1"
## 指定 MinIO 数据卷在容器中的挂载路径。
## @param persistence.mountPath Data volume mount path
##
mountPath: /bitnami/minio/data
## 定义 PVC 的访问模式
## @param persistence.accessModes PVC Access Modes for MinIO® data volume
##
accessModes:
- ReadWriteOnce
##指定 MinIO 数据卷的大小
## @param persistence.size PVC Storage Request for MinIO® data volume
##
size: 200Gi
## 为 PVC 添加自定义注解(annotations)
## @param persistence.annotations Annotations for the PVC
##
annotations: {}
## 指定一个现有的 PVC 名称,用于 MinIO 的数据卷(仅在 standalone 模式下使用)。如果设置了这个值,MinIO 将使用该现有的 PVC,而不是创建新的 PVC。
## @param persistence.existingClaim Name of an existing PVC to use (only in `standalone` mode)
##
existingClaim: ""
## MinIO 持久化卷的权限管理
## @section Volume Permissions parameters
## Init containers parameters:
## volumePermissions: Change the owner and group of the persistent volume mountpoint to runAsUser:fsGroup values from the securityContext section.
## 启用或禁用用于更改持久化卷权限的初始化容器。如果启用,将使用该初始化容器在 MinIO 启动前调整持久化卷的所有者和组。
volumePermissions:
## @param volumePermissions.enabled Enable init container that changes the owner and group of the persistent volume(s) mountpoint to `runAsUser:fsGroup`
##
enabled: false
## @param volumePermissions.image.registry Init container volume-permissions image registry
## @param volumePermissions.image.repository Init container volume-permissions image repository
## @param volumePermissions.image.tag Init container volume-permissions image tag (immutable tags are recommended)
## @param volumePermissions.image.digest Init container volume-permissions image digest in the way sha256:aa.... Please note this parameter, if set, will override the tag
## @param volumePermissions.image.pullPolicy Init container volume-permissions image pull policy
## @param volumePermissions.image.pullSecrets Specify docker-registry secret names as an array
## 配置用于初始化容器的镜像信息,包括镜像的注册表、仓库、标签、摘要以及拉取策略。
image:
registry: docker.io
repository: bitnami/os-shell
tag: 11-debian-11-r86
digest: ""
pullPolicy: IfNotPresent
## Optionally specify an array of imagePullSecrets.
## Secrets must be manually created in the namespace.
## ref: https://kubernetes.io/docs/tasks/configure-pod-container/pull-image-private-registry/
## e.g:
## pullSecrets:
## - myRegistryKeySecretName
##
pullSecrets: []
## Init container' resource requests and limits
## ref: https://kubernetes.io/docs/user-guide/compute-resources/
## We usually recommend not to specify default resources and to leave this as a conscious
## choice for the user. This also increases chances charts run on environments with little
## resources, such as Minikube. If you do want to specify resources, uncomment the following
## lines, adjust them as necessary, and remove the curly braces after 'resources:'.
## @param volumePermissions.resources.limits Init container volume-permissions resource limits
## @param volumePermissions.resources.requests Init container volume-permissions resource requests
##
resources:
## Example:
## limits:
## cpu: 500m
## memory: 1Gi
limits: {}
requests: {}
## Init container' Security Context
## Note: the chown of the data folder is done to containerSecurityContext.runAsUser
## and not the below volumePermissions.containerSecurityContext.runAsUser
## @param volumePermissions.containerSecurityContext.runAsUser User ID for the init container
## 配置初始化容器的安全上下文,特别是指定该容器内进程运行的用户 ID。通常设置为 0,即 root 用户,以确保能够正确更改卷的权限。
containerSecurityContext:
runAsUser: 0
## MinIO 的 ServiceAccount 和 RBAC(基于角色的访问控制) 设置
## @section RBAC parameters
## Specifies whether a ServiceAccount should be created
## 是否为 MinIO Pod 创建一个新的 ServiceAccount。
## 如果设置为 true,将为 MinIO 创建一个新的 ServiceAccount;如果设置为 false,则需要手动指定一个现有的 ServiceAccount。
serviceAccount:
## @param serviceAccount.create Enable the creation of a ServiceAccount for MinIO® pods
##
create: true
## @param serviceAccount.name Name of the created ServiceAccount
## If not set and create is true, a name is generated using the common.names.fullname template
## 指定创建的 ServiceAccount 的名称。如果没有设置名称且 create 为 true,系统会自动生成一个基于 Helm Chart 名称的 ServiceAccount 名称。
name: ""
## @param serviceAccount.automountServiceAccountToken Enable/disable auto mounting of the service account token
## 控制是否自动挂载 ServiceAccount 的令牌到 MinIO Pod 中。如果设置为 true,Kubernetes 会将 ServiceAccount 的令牌自动挂载到 Pod 中;
## 如果设置为 false,则不会挂载令牌。这在某些情况下有助于增强安全性,特别是当 Pod 不需要访问 Kubernetes API 时。
automountServiceAccountToken: true
## @param serviceAccount.annotations Custom annotations for MinIO® ServiceAccount
## 为创建的 ServiceAccount 添加自定义注解
annotations: {}
## MinIO 在分布式模式下的 Pod Disruption Budget (PDB) 配置
## @section Other parameters
## PDB 是 Kubernetes 提供的一种机制,用于确保在执行操作(如节点升级、手动驱逐)时,某个数量或比例的 Pod 始终可用,从而确保应用的高可用性和服务的连续性。
## MinIO® Pod Disruption Budget configuration in distributed mode.
## ref: https://kubernetes.io/docs/tasks/run-application/configure-pdb/
##
pdb:
## @param pdb.create Enable/disable a Pod Disruption Budget creation
## 启用或禁用 Pod Disruption Budget 的创建。如果设置为 true,则会为 MinIO 分布式模式下的 Pod 创建一个 PDB;如果设置为 false,则不会创建 PDB。
create: false
## @param pdb.minAvailable Minimum number/percentage of pods that must still be available after the eviction
## 定义在 Pod 驱逐操作后,必须保持可用的最小 Pod 数量或百分比。可以设置为一个绝对值(如 1)或者一个百分比(如 50%)。
## 该参数确保在进行节点维护或其他操作时,集群中至少有这么多的 Pod 处于可用状态。
minAvailable: 1
## @param pdb.maxUnavailable Maximum number/percentage of pods that may be made unavailable after the eviction
## 定义在 Pod 驱逐操作后,可以不可用的最大 Pod 数量或百分比。可以设置为一个绝对值(如 1)或者一个百分比(如 50%)。
## maxUnavailable 和 minAvailable 不能同时设置,你只能选择其中一个来定义 PDB。
maxUnavailable: ""
## MinIO 的 Prometheus 监控和指标收集设置。
## @section Metrics parameters
metrics:
## @param metrics.prometheusAuthType Authentication mode for Prometheus (`jwt` or `public`)
## To allow public access without authentication for prometheus metrics set environment as follows.
## 定义 Prometheus 访问 MinIO 指标的认证模式
## 有两种模式可选:jwt: 使用 JSON Web Token 进行认证。 public: 公开访问,不需要认证。
prometheusAuthType: public
## Prometheus Operator ServiceMonitor configuration
##
serviceMonitor:
## @param metrics.serviceMonitor.enabled If the operator is installed in your cluster, set to true to create a Service Monitor Entry
## 如果集群中安装了 Prometheus Operator,可以将此选项设置为 true,以创建一个 ServiceMonitor 资源,用于自动发现和配置 MinIO 的指标收集。
enabled: false
## @param metrics.serviceMonitor.namespace Namespace which Prometheus is running in
## 指定 Prometheus 运行的命名空间。ServiceMonitor 将在这个命名空间中查找 Prometheus 实例。
namespace: ""
## @param metrics.serviceMonitor.labels Extra labels for the ServiceMonitor
## 为 ServiceMonitor 添加额外的标签(labels)。这些标签通常用于在 Prometheus 中进行选择和过滤。
labels: {}
## @param metrics.serviceMonitor.jobLabel The name of the label on the target service to use as the job name in Prometheus
## 指定 Prometheus 中用于作为 job 名称的标签名。这决定了 Prometheus 中显示的作业名称。
jobLabel: ""
## @param metrics.serviceMonitor.path HTTP path to scrape for metrics
## 定义 Prometheus 用于抓取 MinIO 指标的 HTTP 路径。默认路径是 /minio/v2/metrics/cluster,用于抓取集群级别的指标。
path: /minio/v2/metrics/cluster
## @param metrics.serviceMonitor.interval Interval at which metrics should be scraped
## 指定 Prometheus 抓取指标的时间间隔。默认值是 30s。
interval: 30s
## @param metrics.serviceMonitor.scrapeTimeout Specify the timeout after which the scrape is ended
## e.g:
## scrapeTimeout: 30s
## 指定 Prometheus 抓取指标的超时时间。设置这个值可以防止长时间抓取导致的资源占用。
scrapeTimeout: ""
## @param metrics.serviceMonitor.metricRelabelings MetricRelabelConfigs to apply to samples before ingestion
## 在将指标导入 Prometheus 之前,应用额外的 relabel 配置。适用于需要调整或过滤指标的情况。
metricRelabelings: []
## @param metrics.serviceMonitor.relabelings Metrics relabelings to add to the scrape endpoint, applied before scraping
##
## 在抓取指标之前,应用额外的 relabel 配置。适用于需要调整或过滤抓取路径的情况。
relabelings: []
## @param metrics.serviceMonitor.honorLabels Specify honorLabels parameter to add the scrape endpoint
##
## 指定 Prometheus 是否应保留目标提供的标签。通常在 Prometheus 配置了全局标签时使用此选项。
honorLabels: false
## @param metrics.serviceMonitor.selector Prometheus instance selector labels
## ref: https://github.com/bitnami/charts/tree/main/bitnami/prometheus-operator#prometheus-configuration
## 用于选择 Prometheus 实例的标签选择器。如果 Prometheus Operator 部署在多个命名空间中,可以通过这个选择器指定特定的 Prometheus 实例。
selector: {}
## @param metrics.serviceMonitor.apiVersion ApiVersion for the serviceMonitor Resource (defaults to "monitoring.coreos.com/v1")
## 指定 ServiceMonitor 资源的 API 版本,默认为 "monitoring.coreos.com/v1"。如果集群中使用了不同的 API 版本,可以在这里进行指定。
apiVersion: ""
## @param metrics.serviceMonitor.tlsConfig Additional TLS configuration for metrics endpoint with "https" scheme
## ref: https://github.com/prometheus-operator/prometheus-operator/blob/main/Documentation/api.md#monitoring.coreos.com/v1.TLSConfig
## 为抓取 MinIO 指标配置额外的 TLS 选项。如果指标路径需要通过 HTTPS 进行安全访问,可以在这里配置 TLS 相关设置。
tlsConfig: {}
#serviceMonitor:
# tlsConfig:
# insecureSkipVerify: true
## Prometheus Operator 的 PrometheusRule 资源配置
## Prometheus Operator PrometheusRule configuration
##
prometheusRule:
## @param metrics.prometheusRule.enabled Create a Prometheus Operator PrometheusRule (also requires `metrics.enabled` to be `true` and `metrics.prometheusRule.rules`)
## 启用或禁用 PrometheusRule 的创建。
enabled: false
## @param metrics.prometheusRule.namespace Namespace for the PrometheusRule Resource (defaults to the Release Namespace)
## 指定 PrometheusRule 资源所在的命名空间。如果不设置,将使用 Helm Release 所在的命名空间。
namespace: ""
## @param metrics.prometheusRule.additionalLabels Additional labels that can be used so PrometheusRule will be discovered by Prometheus
## 为 PrometheusRule 添加额外的标签(labels)。这些标签可以用于 Prometheus 选择和过滤规则,确保规则能够被正确识别和使用。
additionalLabels: {}
## 定义 Prometheus 的告警规则:
## 每个规则包含以下关键字段:
## alert: 告警名称。
## annotations: 告警的附加信息,通常包括摘要和描述。
## for: 告警触发前的等待时间(条件满足后经过指定时间才会触发告警)。
## expr: Prometheus 表达式,用于定义告警条件。
## labels: 为告警规则添加标签,通常用于分类和分组告警。
## @param metrics.prometheusRule.rules Prometheus Rule definitions
# - alert: minio cluster nodes offline
# annotations:
# summary: "minio cluster nodes offline"
# description: "minio cluster nodes offline, pod {{`{{`}} $labels.pod {{`}}`}} service {{`{{`}} $labels.job {{`}}`}} offline"
# for: 10m
# expr: minio_cluster_nodes_offline_total > 0
# labels:
# severity: critical
# group: PaaS
rules: []# ci/loki-values.yaml
image:
registry: registry.cn-beijing.aliyuncs.com
repository: xxk8s/minio
tag: 2022.12.12-debian-11-r9
clientImage:
registry: registry.cn-beijing.aliyuncs.com
repository: xxk8s/minio-client
tag: 2022.12.24-debian-11-r1
digest: ""
accessKey: 'AkfemQkKnBWa6'
secretKey: '3USBrfP1hCa'
persistence:
enabled: true
storageClass: 'rook-ceph-block-test1:'
accessMode: ReadWriteOnce
size: 100Gi
service:
type: NodePort
port: 9000
nodePort: 31120
resources:
requests:
memory: 1Gi直接使用上面配置的 values 文件安装 minio:
root@master01:/k8s-logging/loki-Microservices/minio#  helm upgrade --install loki-minio -n loki-distributed -f values.yaml .
Release "loki-minio" does not exist. Installing it now.
NAME: loki-minio
LAST DEPLOYED: Tue Sep  3 17:12:15 2024
NAMESPACE: loki-distributed
STATUS: deployed
REVISION: 1
TEST SUITE: None
NOTES:
CHART NAME: minio
CHART VERSION: 12.8.12
APP VERSION: 2023.9.30

** Please be patient while the chart is being deployed **

MinIO® can be accessed via port  on the following DNS name from within your cluster:

   loki-minio.loki-distributed.svc.cluster.local

To get your credentials run:

   export ROOT_USER=$(kubectl get secret --namespace loki-distributed minio-secret -o jsonpath="{.data.root-user}" | base64 -d)
   export ROOT_PASSWORD=$(kubectl get secret --namespace loki-distributed minio-secret -o jsonpath="{.data.root-password}" | base64 -d)

To connect to your MinIO® server using a client:

- Run a MinIO® Client pod and append the desired command (e.g. 'admin info'):

   kubectl run --namespace loki-distributed loki-minio-client \
     --rm --tty -i --restart='Never' \
     --env MINIO_SERVER_ROOT_USER=$ROOT_USER \
     --env MINIO_SERVER_ROOT_PASSWORD=$ROOT_PASSWORD \
     --env MINIO_SERVER_HOST=loki-minio \
     --image registry.cn-beijing.aliyuncs.com/xxk8s/minio-client:2023.9.29-debian-11-r2 -- admin info minio

To access the MinIO® web UI:

- Get the MinIO® URL:

   export NODE_PORT=$(kubectl get --namespace loki-distributed -o jsonpath="{.spec.ports[0].nodePort}" services loki-minio)
   export NODE_IP=$(kubectl get nodes --namespace loki-distributed -o jsonpath="{.items[0].status.addresses[0].address}")
echo "MinIO® web URL: http://$NODE_IP:$NODE_PORT/minio"安装完成后查看对应的 Pod 状态:
root@master01:/k8s-logging/loki-Microservices/minio# kubectl get pod -n loki-distributed
NAME                          READY   STATUS    RESTARTS   AGE
loki-minio-57f9fd44cd-pks42   1/1     Running   0          73s


$ kubectl get svc -n  loki-distributed
root@master01:/k8s-logging/loki-Microservices/minio# kubectl get svc -n  loki-distributed
NAME         TYPE       CLUSTER-IP      EXTERNAL-IP   PORT(S)                         AGE
loki-minio NodePort 10.108.159.43 <none> 9000:31390/TCP,9001:31391/TCP 4m41s可以通过指定的 31391 端口来访问 minio:
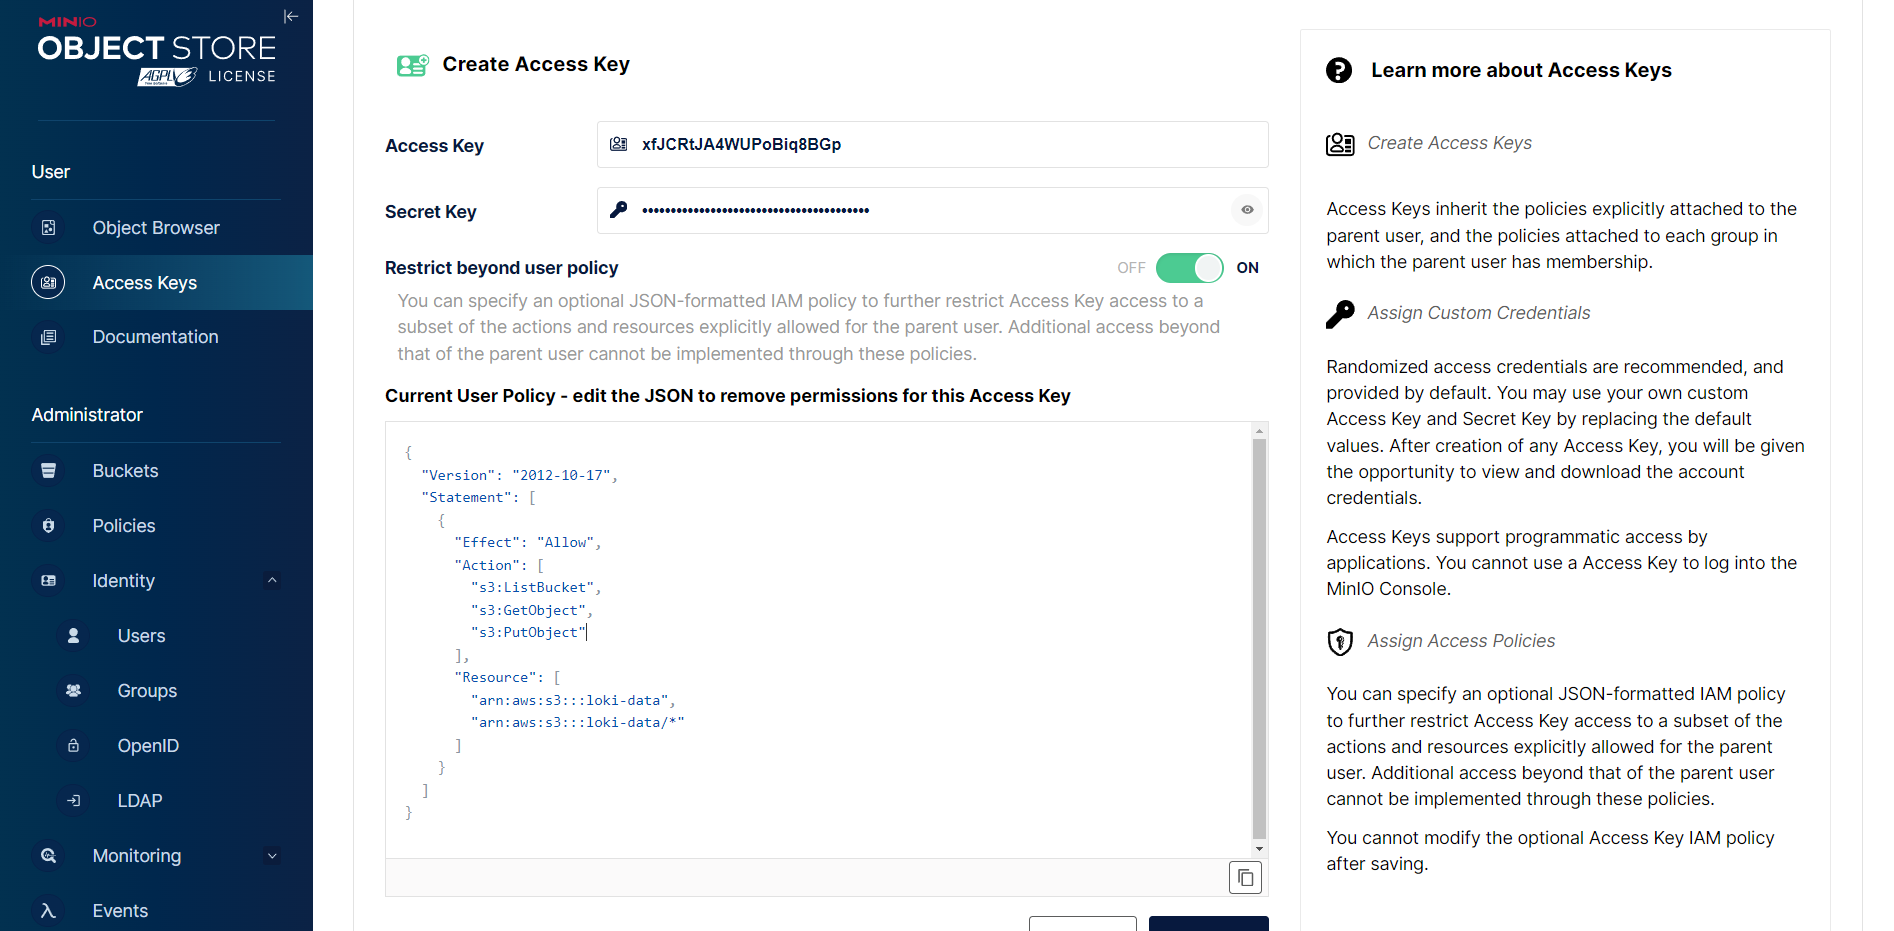
创建 iam 策略
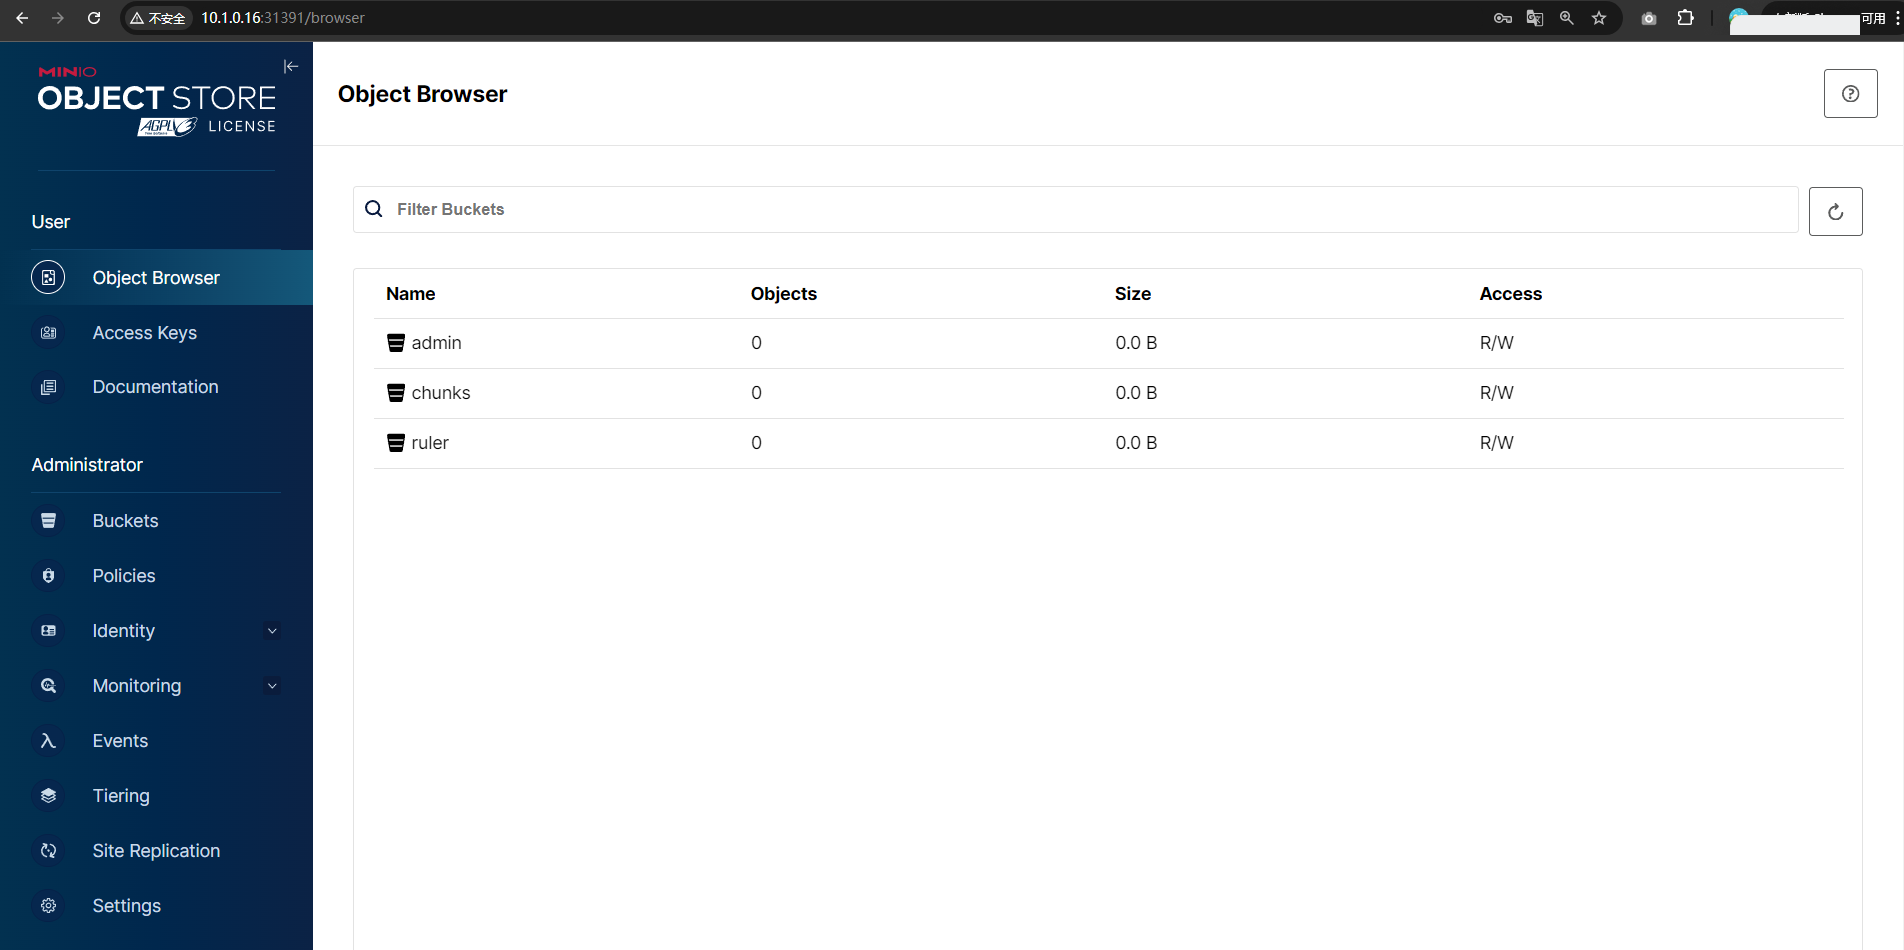
然后记得创建一个名为 loki-data 的 bucket。
测试 Accesskey bucket 上传
import boto3
import os
import sys

# 打印启动信息到标准输出
print("Starting MinIO test script...", file=sys.stdout)

# 从环境变量中获取 MinIO 配置信息
minio_server = os.getenv("MINIO_SERVER", "http://loki-minio.loki-distributed.svc.cluster.local:9000")
access_key = os.getenv("MINIO_ACCESS_KEY", "XmjSsr2lIIhww2GXYiIQ")
secret_key = os.getenv("MINIO_SECRET_KEY", "cjrN7LzFf6J6GXmh1OluOSwIBkNp6gUTu4Uag3t1")

# 打印调试信息到标准输出
print(f"[DEBUG] MinIO Server: {minio_server}", file=sys.stdout)
print(f"[DEBUG] Access Key: {access_key}", file=sys.stdout)
print("[DEBUG] Secret Key: [HIDDEN]", file=sys.stdout)  # 不建议打印 Secret Key 以防泄露

# 创建 S3 客户端
try:
    print("[DEBUG] Creating S3 client...", file=sys.stdout)
    s3_client = boto3.client(
        's3',
        endpoint_url=minio_server,
        aws_access_key_id=access_key,
        aws_secret_access_key=secret_key,
        region_name="us-east-1",
    )
    print("[DEBUG] S3 client created successfully.", file=sys.stdout)
except Exception as e:
    print(f"[ERROR] Failed to create S3 client: {e}", file=sys.stdout)
    sys.exit(1)

# 使用指定的存储桶
bucket_name = "loki-data"
file_name = "test.txt"
downloaded_file_name = "downloaded_test.txt"

try:
    # 打印正在创建/检查存储桶
    print(f"[DEBUG] Checking if bucket '{bucket_name}' exists...", file=sys.stdout)

    # 检查存储桶是否存在
    if s3_client.head_bucket(Bucket=bucket_name):
        print(f"[INFO] Bucket '{bucket_name}' already exists.", file=sys.stdout)
    else:
        # 创建存储桶(如果不存在)
        print(f"[DEBUG] Creating bucket '{bucket_name}'...", file=sys.stdout)
        s3_client.create_bucket(Bucket=bucket_name)
        print(f"[INFO] Bucket '{bucket_name}' created successfully.", file=sys.stdout)

    # 上传文件
    print(f"[DEBUG] Uploading file '{file_name}' to bucket '{bucket_name}'...", file=sys.stdout)
    with open(file_name, "w") as f:
        f.write("Hello, MinIO!")
    s3_client.upload_file(file_name, bucket_name, file_name)
    print(f"[INFO] File '{file_name}' uploaded successfully to bucket '{bucket_name}'.", file=sys.stdout)

    # 下载文件
    print(f"[DEBUG] Downloading file '{file_name}' from bucket '{bucket_name}'...", file=sys.stdout)
    s3_client.download_file(bucket_name, file_name, downloaded_file_name)
    print(f"[INFO] File '{file_name}' downloaded successfully from bucket '{bucket_name}'.", file=sys.stdout)

    # 验证下载的文件
    print(f"[DEBUG] Validating content of downloaded file '{downloaded_file_name}'...", file=sys.stdout)
    with open(downloaded_file_name, "r") as f:
        content = f.read()
    assert content == "Hello, MinIO!", "File content does not match!"
    print("[INFO] File content is correct.", file=sys.stdout)
except boto3.exceptions.S3UploadFailedError as e:
    print(f"[ERROR] Upload failed: {e}", file=sys.stdout)
except boto3.exceptions.S3DownloadError as e:
    print(f"[ERROR] Download failed: {e}", file=sys.stdout)
except AssertionError as e:
    print(f"[ERROR] Validation failed: {e}", file=sys.stdout)
except Exception as e:
    print(f"[ERROR] An unexpected error occurred: {e}", file=sys.stdout)
finally:
    # 清理本地生成的文件
    print(f"[DEBUG] Cleaning up local files...", file=sys.stdout)
    if os.path.exists(file_name):
        os.remove(file_name)
        print(f"[DEBUG] Removed '{file_name}'.", file=sys.stdout)
    if os.path.exists(downloaded_file_name):
        os.remove(downloaded_file_name)
        print(f"[DEBUG] Removed '{downloaded_file_name}'.", file=sys.stdout)

    # 打印结束信息到标准输出
print("[INFO] MinIO test script completed.", file=sys.stdout)docker file
# 使用官方的 Python 运行时基础镜像
FROM registry.cn-beijing.aliyuncs.com/xxk8s/python:3.9-slim

# 设置工作目录
WORKDIR /app

# 复制 Python 脚本到容器中
COPY minio_test.py .

# 设置 pip 的国内镜像源并安装 boto3 库
RUN pip install --no-cache-dir -i https://mirrors.aliyun.com/pypi/simple/ boto3


# 运行 Python 脚本
CMD ["python", "minio_test.py"]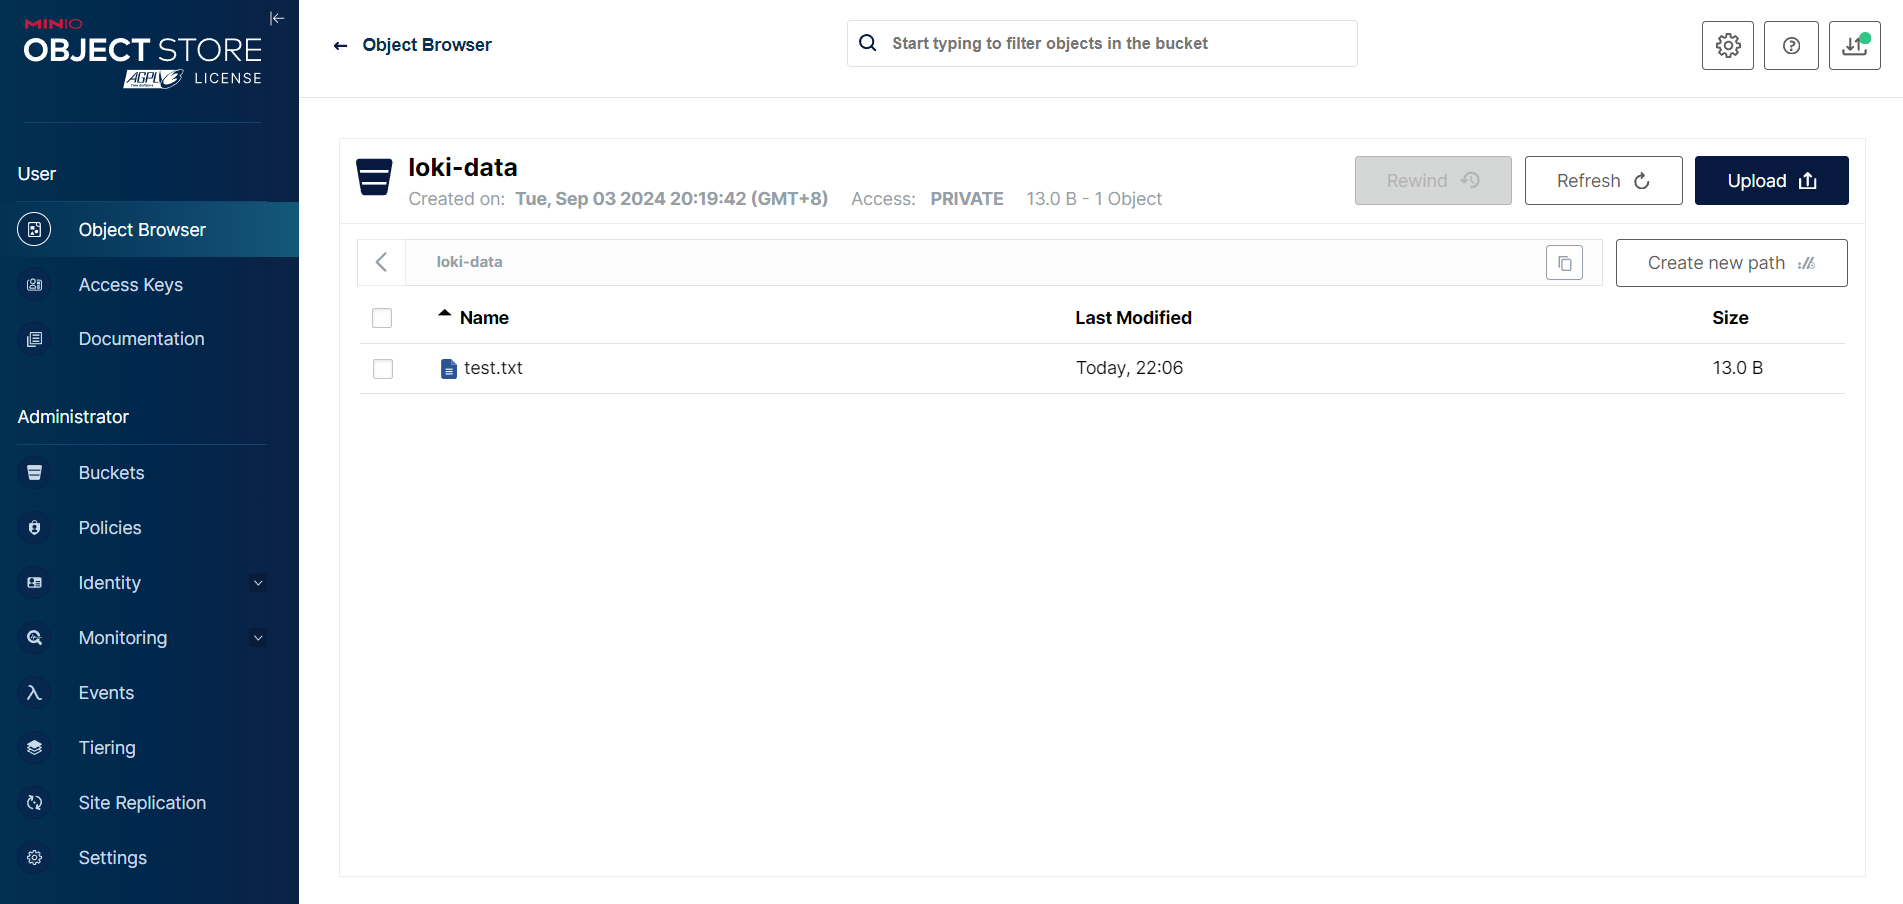
查看日志
root@master01:/k8s-logging/loki-Microservices/minio# kubectl logs -n loki-distributed minio-test-deployment-5bd997bf8c-zj9bf
Starting MinIO test script...
[DEBUG] MinIO Server: http://loki-minio.loki-distributed.svc.cluster.local:9000
[DEBUG] Access Key: XmjSsr2lIIhww2GXYiIQ
[DEBUG] Secret Key: [HIDDEN]
[DEBUG] Creating S3 client...
[DEBUG] S3 client created successfully.
[DEBUG] Checking if bucket 'loki-data' exists...
[INFO] Bucket 'loki-data' already exists.
[DEBUG] Uploading file 'test.txt' to bucket 'loki-data'...
[INFO] File 'test.txt' uploaded successfully to bucket 'loki-data'.
[DEBUG] Downloading file 'test.txt' from bucket 'loki-data'...
[INFO] File 'test.txt' downloaded successfully from bucket 'loki-data'.
[DEBUG] Validating content of downloaded file 'downloaded_test.txt'...
[INFO] File content is correct.
[DEBUG] Cleaning up local files...
[DEBUG] Removed 'test.txt'.
[DEBUG] Removed 'downloaded_test.txt'.
[INFO] MinIO test script completed.安装 Loki
现在将我们的对象存储准备好后,接下来我们来安装微服务模式的 Loki,首先创建一个如下所示的 values 文件:
# ci/minio-values.yaml
loki:
  structuredConfig:
    ingester:
      max_transfer_retries: 0
      chunk_idle_period: 1h
      chunk_target_size: 1536000
      max_chunk_age: 1h
    storage_config:
      aws:
        endpoint: loki-minio.loki-distributed.svc.cluster.local:9000
        insecure: true
        bucketnames: loki-data
        access_key_id: XmjSsr2lIIhww2GXYiIQ
        secret_access_key: cjrN7LzFf6J6GXmh1OluOSwIBkNp6gUTu4Uag3t1
        s3forcepathstyle: true
      boltdb_shipper:
        shared_store: s3
    schema_config:
      configs:
        - from: 2024-09-03
          store: boltdb-shipper
          object_store: s3
          schema: v12
          index:
            prefix: loki_index_
            period: 24h

distributor:
  replicas: 2

ingester:
  replicas: 2
  persistence:
    enabled: true
    size: 10Gi
    storageClass: rook-ceph-block-test1

querier:
  replicas: 2
  persistence:
    enabled: true
    size: 10Gi
    storageClass: rook-ceph-block-test1

queryFrontend:
  replicas: 2

gateway:
  nginxConfig:
    httpSnippet: |-
      client_max_body_size 100M;
    serverSnippet: |-
client_max_body_size 100M;上述配置会选择性地覆盖 loki.config 模板文件中的默认值,使用 loki.structuredConfig 可以在外部设置大多数配置参数。loki.config、loki.schemaConfig 和 loki.storageConfig 也可以与 loki.structuredConfig 结合使用。 loki.structuredConfig 中的值优先级更高。
这里我们通过 loki.structuredConfig.storage_config.aws 指定了用于保存数据的 minio 配置,为了高可用,核心的几个组件我们配置了 2 个副本,ingester 和 querier 配置了持久化存储。
现在使用上面的 values 文件进行一键安装:
$ helm upgrade --install loki -n loki-distributed -f ci/minio-values.yaml .
root@master01:/k8s-logging/loki-Microservices/loki-distributed# helm upgrade --install loki -n loki-distributed -f minio-values.yaml .
Release "loki" does not exist. Installing it now.
NAME: loki
LAST DEPLOYED: Tue Sep  3 22:42:44 2024
NAMESPACE: loki-distributed
STATUS: deployed
REVISION: 1
TEST SUITE: None
NOTES:
***********************************************************************
 Welcome to Grafana Loki
 Chart version: 0.48.4
 Loki version: 2.5.0
***********************************************************************

Installed components:
* gateway
* ingester
* distributor
* querier
* query-frontend上面会分别安装几个组件:gateway、ingester、distributor、querier、query-frontend,对应的 Pod 状态如下所示:
$ kubectl get pods -n loki-distributed
NAME                                                    READY   STATUS    RESTARTS       AGE
loki-loki-distributed-distributor-64b7dbdc4b-b5j99      1/1     Running            0                94s
loki-loki-distributed-distributor-64b7dbdc4b-sm7j2      1/1     Running            0                94s
loki-loki-distributed-gateway-645c7c7d78-9jj7b          1/1     Running            0                94s
loki-loki-distributed-ingester-0                        1/1     Running            0                94s
loki-loki-distributed-ingester-1                        1/1     Running            0                94s
loki-loki-distributed-querier-0                         1/1     Running            0                94s
loki-loki-distributed-querier-1                         1/1     Running            0                94s
loki-loki-distributed-query-frontend-5985bb8c9b-89vg7   1/1     Running            0                94s
loki-loki-distributed-query-frontend-5985bb8c9b-jtdzq   1/1     Running            0                94s
loki-minio-57f9fd44cd-pks42                             1/1     Running            0                5h29m


$ kubectl get svc -n loki-distributed
NAME                                      TYPE        CLUSTER-IP       EXTERNAL-IP   PORT(S)                      AGE
loki-loki-distributed-distributor         ClusterIP   10.102.156.127   <none>        3100/TCP,9095/TCP            22m
loki-loki-distributed-gateway             ClusterIP   10.111.73.138    <none>        80/TCP                       22m
loki-loki-distributed-ingester            ClusterIP   10.98.238.236    <none>        3100/TCP,9095/TCP            22m
loki-loki-distributed-ingester-headless   ClusterIP   None             <none>        3100/TCP,9095/TCP            22m
loki-loki-distributed-memberlist          ClusterIP   None             <none>        7946/TCP                     22m
loki-loki-distributed-querier             ClusterIP   10.101.117.137   <none>        3100/TCP,9095/TCP            22m
loki-loki-distributed-querier-headless    ClusterIP   None             <none>        3100/TCP,9095/TCP            22m
loki-loki-distributed-query-frontend      ClusterIP   None             <none>        3100/TCP,9095/TCP,9096/TCP   22m
minio                                     NodePort    10.111.58.196    <none>        9000:32000/TCP               47h


root@master01:/k8s-logging/loki-Microservices/loki-distributed# kubectl get svc -n loki-distributed
NAME                                      TYPE        CLUSTER-IP       EXTERNAL-IP   PORT(S)                         AGE
loki-loki-distributed-distributor         ClusterIP   10.97.158.75     <none>        3100/TCP,9095/TCP               2m7s
loki-loki-distributed-gateway             ClusterIP   10.105.119.157   <none>        80/TCP                          2m7s
loki-loki-distributed-ingester            ClusterIP   10.108.63.117    <none>        3100/TCP,9095/TCP               2m7s
loki-loki-distributed-ingester-headless   ClusterIP   None             <none>        3100/TCP,9095/TCP               2m7s
loki-loki-distributed-memberlist          ClusterIP   None             <none>        7946/TCP                        2m7s
loki-loki-distributed-querier             ClusterIP   10.103.71.57     <none>        3100/TCP,9095/TCP               2m7s
loki-loki-distributed-querier-headless    ClusterIP   None             <none>        3100/TCP,9095/TCP               2m7s
loki-loki-distributed-query-frontend      ClusterIP   None             <none>        3100/TCP,9095/TCP,9096/TCP      2m7s
loki-minio NodePort 10.108.159.43 <none> 9000:31390/TCP,9001:31391/TCP 5h32mLoki 对应的配置文件如下所示:
$ kubectl get cm -n logging loki-loki-distributed -o yaml
apiVersion: v1
data:
  config.yaml: |
    auth_enabled: false
    chunk_store_config:
      max_look_back_period: 0s
    compactor:
      shared_store: filesystem
    distributor:
      ring:
        kvstore:
          store: memberlist
    frontend:
      compress_responses: true
      log_queries_longer_than: 5s
      tail_proxy_url: http://loki-loki-distributed-querier:3100
    frontend_worker:
      frontend_address: loki-loki-distributed-query-frontend:9095
    ingester:
      chunk_block_size: 262144
      chunk_encoding: snappy
      chunk_idle_period: 1h
      chunk_retain_period: 1m
      chunk_target_size: 1536000
      lifecycler:
        ring:
          kvstore:
            store: memberlist
          replication_factor: 1
      max_chunk_age: 1h
      max_transfer_retries: 0
      wal:
        dir: /var/loki/wal
    limits_config:
      enforce_metric_name: false
      max_cache_freshness_per_query: 10m
      reject_old_samples: true
      reject_old_samples_max_age: 168h
      split_queries_by_interval: 15m
    memberlist:
      join_members:
      - loki-loki-distributed-memberlist
    query_range:
      align_queries_with_step: true
      cache_results: true
      max_retries: 5
      results_cache:
        cache:
          enable_fifocache: true
          fifocache:
            max_size_items: 1024
            validity: 24h
    ruler:
      alertmanager_url: https://alertmanager.xx
      external_url: https://alertmanager.xx
      ring:
        kvstore:
          store: memberlist
      rule_path: /tmp/loki/scratch
      storage:
        local:
          directory: /etc/loki/rules
        type: local
    schema_config:
      configs:
      - from: "2022-06-21"
        index:
          period: 24h
          prefix: loki_index_
        object_store: s3
        schema: v12
        store: boltdb-shipper
    server:
      http_listen_port: 3100
    storage_config:
      aws:
        access_key_id: myaccessKey
        bucketnames: loki-data
        endpoint: minio.logging.svc.cluster.local:9000
        insecure: true
        s3forcepathstyle: true
        secret_access_key: mysecretKey
      boltdb_shipper:
        active_index_directory: /var/loki/index
        cache_location: /var/loki/cache
        cache_ttl: 168h
        shared_store: s3
      filesystem:
        directory: /var/loki/chunks
    table_manager:
      retention_deletes_enabled: false
      retention_period: 0s
kind: ConfigMap
# ......同样其中有一个 gateway 组件会来帮助我们将请求路由到正确的组件中去,该组件同样就是一个 nginx 服务,对应的配置如下所示:
$ kubectl -n logging exec -it loki-loki-distributed-gateway-6f4cfd898c-hpszv -- cat /etc/nginx/nginx.conf
worker_processes  5;  ## Default: 1
error_log  /dev/stderr;
pid        /tmp/nginx.pid;
worker_rlimit_nofile 8192;

events {
  worker_connections  4096;  ## Default: 1024
}

http {
  client_body_temp_path /tmp/client_temp;
  proxy_temp_path       /tmp/proxy_temp_path;
  fastcgi_temp_path     /tmp/fastcgi_temp;
  uwsgi_temp_path       /tmp/uwsgi_temp;
  scgi_temp_path        /tmp/scgi_temp;

  default_type application/octet-stream;
  log_format   main '$remote_addr - $remote_user [$time_local]  $status '
        '"$request" $body_bytes_sent "$http_referer" '
        '"$http_user_agent" "$http_x_forwarded_for"';
  access_log   /dev/stderr  main;

  sendfile     on;
  tcp_nopush   on;
  resolver kube-dns.kube-system.svc.cluster.local;

  client_max_body_size 100M;

  server {
    listen             8080;

    location = / {
      return 200 'OK';
      auth_basic off;
    }

    location = /api/prom/push {
      proxy_pass       http://loki-loki-distributed-distributor.logging.svc.cluster.local:3100$request_uri;
    }

    location = /api/prom/tail {
      proxy_pass       http://loki-loki-distributed-querier.logging.svc.cluster.local:3100$request_uri;
      proxy_set_header Upgrade $http_upgrade;
      proxy_set_header Connection "upgrade";
    }

    # Ruler
    location ~ /prometheus/api/v1/alerts.* {
      proxy_pass       http://loki-loki-distributed-ruler.logging.svc.cluster.local:3100$request_uri;
    }
    location ~ /prometheus/api/v1/rules.* {
      proxy_pass       http://loki-loki-distributed-ruler.logging.svc.cluster.local:3100$request_uri;
    }
    location ~ /api/prom/rules.* {
      proxy_pass       http://loki-loki-distributed-ruler.logging.svc.cluster.local:3100$request_uri;
    }
    location ~ /api/prom/alerts.* {
      proxy_pass       http://loki-loki-distributed-ruler.logging.svc.cluster.local:3100$request_uri;
    }

    location ~ /api/prom/.* {
      proxy_pass       http://loki-loki-distributed-query-frontend.logging.svc.cluster.local:3100$request_uri;
    }

    location = /loki/api/v1/push {
      proxy_pass       http://loki-loki-distributed-distributor.logging.svc.cluster.local:3100$request_uri;
    }

    location = /loki/api/v1/tail {
      proxy_pass       http://loki-loki-distributed-querier.logging.svc.cluster.local:3100$request_uri;
      proxy_set_header Upgrade $http_upgrade;
      proxy_set_header Connection "upgrade";
    }

    location ~ /loki/api/.* {
      proxy_pass       http://loki-loki-distributed-query-frontend.logging.svc.cluster.local:3100$request_uri;
    }

    client_max_body_size 100M;
  }
}从上面配置可以看出对应的 Push 端点 /api/prom/push 与 /loki/api/v1/push 会转发给 http://loki-loki-distributed-distributor.loki-distributed.svc.cluster.local:3100$request_uri;,也就是对应的 distributor 服务:
root@master01:/k8s-logging/loki-Microservices/loki-distributed# kubectl get pods -n loki-distributed -l app.kubernetes.io/component=distributor,app.kubernetes.io/instance=loki,app.kubernetes.io/name=loki-distributed
NAME                                                 READY   STATUS    RESTARTS   AGE
loki-loki-distributed-distributor-64b7dbdc4b-b5j99   1/1     Running   0          3m20s
loki-loki-distributed-distributor-64b7dbdc4b-sm7j2 1/1 Running 0 3m20s所以如果我们要写入日志数据,自然现在是写入到 gateway 的 Push 端点上去。为了验证应用是否正常,接下来我们再安装 Promtail 和 Grafana 来进行数据的读写。
安装 Promtail
获取 promtail 的 Chart 包并解压:
$ helm pull grafana/promtail --untar
$ cd promtail创建一个如下所示的 values 文件:
# simple-values.yaml
rbac:
  pspEnabled: false
config:
  clients:
- url: http://loki-loki-distributed-gateway/loki/api/v1/push注意我们需要将 Promtail 中配置的 Loki 地址为 http://loki-loki-distributed-gateway/loki/api/v1/push,这样就是 Promtail 将日志数据首先发送到 gateway 上面去,然后 gateway 根据我们的 Endpoints 去转发给 write 节点,使用上面的 values 文件来安装 Promtail:
$ helm upgrade --install promtail -n loki-distributed -f simple-values.yaml .
Release "promtail" does not exist. Installing it now.
NAME: promtail
LAST DEPLOYED: Tue Jun 21 16:31:34 2022
NAMESPACE: logging
STATUS: deployed
REVISION: 1
TEST SUITE: None
NOTES:
***********************************************************************
 Welcome to Grafana Promtail
 Chart version: 5.1.0
 Promtail version: 2.5.0
***********************************************************************

Verify the application is working by running these commands:

* kubectl --namespace logging port-forward daemonset/promtail 3101
* curl http://127.0.0.1:3101/metricsroot@master01:/k8s-logging/loki-Microservices/promtail# helm upgrade --install promtail-2 -n loki-distributed -f simple-values.yaml .
Release "promtail-2" does not exist. Installing it now.
NAME: promtail-2
LAST DEPLOYED: Tue Sep 3 22:50:35 2024
NAMESPACE: loki-distributed
STATUS: deployed
REVISION: 1
TEST SUITE: None
NOTES:
***********************************************************************
Welcome to Grafana Promtail
Chart version: 5.1.0
Promtail version: 2.5.0-debian-11-r12
***********************************************************************
Verify the application is working by running these commands:
* kubectl --namespace loki-distributed port-forward daemonset/promtail-2 3101
* curl http://127.0.0.1:3101/metrics正常安装完成后会在每个节点上运行一个 promtail:
$ kubectl get pods -n loki-distributed -l app.kubernetes.io/name=promtail
root@master01:/k8s-logging/loki-Microservices/promtail# kubectl get pods -n loki-distributed -l app.kubernetes.io/name=promtail
NAME               READY   STATUS    RESTARTS   AGE
promtail-2-cd8hb   1/1     Running   0          47s
promtail-2-kfgl9   1/1     Running   0          47s
promtail-2-vz8sn 1/1 Running 0 47s正常 promtail 就已经在开始采集所在节点上的所有容器日志了,然后将日志数据 Push 给 gateway,gateway 转发给 write 节点,我们可以查看 gateway 的日志:
$ kubectl logs -f loki-loki-distributed-gateway-645c7c7d78-9jj7b -n loki-distributed
10.244.0.1 - - [03/Sep/2024:14:52:05 +0000]  200 "GET / HTTP/1.1" 2 "-" "kube-probe/1.22" "-"
10.244.2.119 - - [03/Sep/2024:14:52:05 +0000]  204 "POST /loki/api/v1/push HTTP/1.1" 0 "-" "promtail/2.5.0" "-"
10.244.0.107 - - [03/Sep/2024:14:52:05 +0000]  204 "POST /loki/api/v1/push HTTP/1.1" 0 "-" "promtail/2.5.0" "-"
10.244.3.62 - - [03/Sep/2024:14:52:05 +0000]  204 "POST /loki/api/v1/push HTTP/1.1" 0 "-" "promtail/2.5.0" "-"
10.244.0.107 - - [03/Sep/2024:14:52:06 +0000]  204 "POST /loki/api/v1/push HTTP/1.1" 0 "-" "promtail/2.5.0" "-"
10.244.2.119 - - [03/Sep/2024:14:52:06 +0000]  204 "POST /loki/api/v1/push HTTP/1.1" 0 "-" "promtail/2.5.0" "-"
10.244.2.119 - - [03/Sep/2024:14:52:07 +0000]  204 "POST /loki/api/v1/push HTTP/1.1" 0 "-" "promtail/2.5.0" "-"
10.244.0.107 - - [03/Sep/2024:14:52:07 +0000]  204 "POST /loki/api/v1/push HTTP/1.1" 0 "-" "promtail/2.5.0" "-"
10.244.3.62 - - [03/Sep/2024:14:52:08 +0000]  204 "POST /loki/api/v1/push HTTP/1.1" 0 "-" "promtail/2.5.0" "-"
10.244.2.119 - - [03/Sep/2024:14:52:09 +0000]  204 "POST /loki/api/v1/push HTTP/1.1" 0 "-" "promtail/2.5.0" "-"
10.244.0.107 - - [03/Sep/2024:14:52:09 +0000]  204 "POST /loki/api/v1/push HTTP/1.1" 0 "-" "promtail/2.5.0" "-"
10.244.3.62 - - [03/Sep/2024:14:52:10 +0000]  204 "POST /loki/api/v1/push HTTP/1.1" 0 "-" "promtail/2.5.0" "-"
10.244.0.107 - - [03/Sep/2024:14:52:10 +0000]  204 "POST /loki/api/v1/push HTTP/1.1" 0 "-" "promtail/2.5.0" "-"
10.244.2.119 - - [03/Sep/2024:14:52:10 +0000]  204 "POST /loki/api/v1/push HTTP/1.1" 0 "-" "promtail/2.5.0" "-"
10.244.0.107 - - [03/Sep/2024:14:52:11 +0000]  204 "POST /loki/api/v1/push HTTP/1.1" 0 "-" "promtail/2.5.0" "-"
10.244.3.62 - - [03/Sep/2024:14:52:11 +0000]  204 "POST /loki/api/v1/push HTTP/1.1" 0 "-" "promtail/2.5.0" "-"
10.244.2.119 - - [03/Sep/2024:14:52:11 +0000]  204 "POST /loki/api/v1/push HTTP/1.1" 0 "-" "promtail/2.5.0" "-"
10.244.0.107 - - [03/Sep/2024:14:52:12 +0000]  204 "POST /loki/api/v1/push HTTP/1.1" 0 "-" "promtail/2.5.0" "-"
10.244.2.119 - - [03/Sep/2024:14:52:13 +0000]  204 "POST /loki/api/v1/push HTTP/1.1" 0 "-" "promtail/2.5.0" "-"
10.244.3.62 - - [03/Sep/2024:14:52:13 +0000]  204 "POST /loki/api/v1/push HTTP/1.1" 0 "-" "promtail/2.5.0" "-"
10.244.0.107 - - [03/Sep/2024:14:52:14 +0000]  204 "POST /loki/api/v1/push HTTP/1.1" 0 "-" "promtail/2.5.0" "-"
10.244.2.119 - - [03/Sep/2024:14:52:14 +0000]  204 "POST /loki/api/v1/push HTTP/1.1" 0 "-" "promtail/2.5.0" "-"
10.244.0.1 - - [03/Sep/2024:14:52:15 +0000]  200 "GET / HTTP/1.1" 2 "-" "kube-probe/1.22" "-"
10.244.0.107 - - [03/Sep/2024:14:52:15 +0000]  204 "POST /loki/api/v1/push HTTP/1.1" 0 "-" "promtail/2.5.0" "-"
10.244.3.62 - - [03/Sep/2024:14:52:15 +0000]  204 "POST /loki/api/v1/push HTTP/1.1" 0 "-" "promtail/2.5.0" "-"
10.244.2.119 - - [03/Sep/2024:14:52:15 +0000]  204 "POST /loki/api/v1/push HTTP/1.1" 0 "-" "promtail/2.5.0" "-"
10.244.0.107 - - [03/Sep/2024:14:52:16 +0000]  204 "POST /loki/api/v1/push HTTP/1.1" 0 "-" "promtail/2.5.0" "-"
10.244.2.119 - - [03/Sep/2024:14:52:17 +0000]  204 "POST /loki/api/v1/push HTTP/1.1" 0 "-" "promtail/2.5.0" "-"
10.244.3.62 - - [03/Sep/2024:14:52:17 +0000]  204 "POST /loki/api/v1/push HTTP/1.1" 0 "-" "promtail/2.5.0" "-"
10.244.0.107 - - [03/Sep/2024:14:52:17 +0000]  204 "POST /loki/api/v1/push HTTP/1.1" 0 "-" "promtail/2.5.0" "-"
10.244.2.119 - - [03/Sep/2024:14:52:18 +0000]  204 "POST /loki/api/v1/push HTTP/1.1" 0 "-" "promtail/2.5.0" "-"
10.244.0.107 - - [03/Sep/2024:14:52:19 +0000]  204 "POST /loki/api/v1/push HTTP/1.1" 0 "-" "promtail/2.5.0" "-"
10.244.2.119 - - [03/Sep/2024:14:52:19 +0000]  204 "POST /loki/api/v1/push HTTP/1.1" 0 "-" "promtail/2.5.0" "-"
10.244.3.62 - - [03/Sep/2024:14:52:20 +0000]  204 "POST /loki/api/v1/push HTTP/1.1" 0 "-" "promtail/2.5.0" "-"

......可以看到 gateway 现在在一直接接收着 /loki/api/v1/push 的请求,也就是 promtail 发送过来的,正常来说现在日志数据已经分发给 write 节点了,write 节点将数据存储在了 minio 中,可以去查看下 minio 中已经有日志数据了,前面安装的时候为 minio 服务指定了一个 32000 的 NodePort 端口:
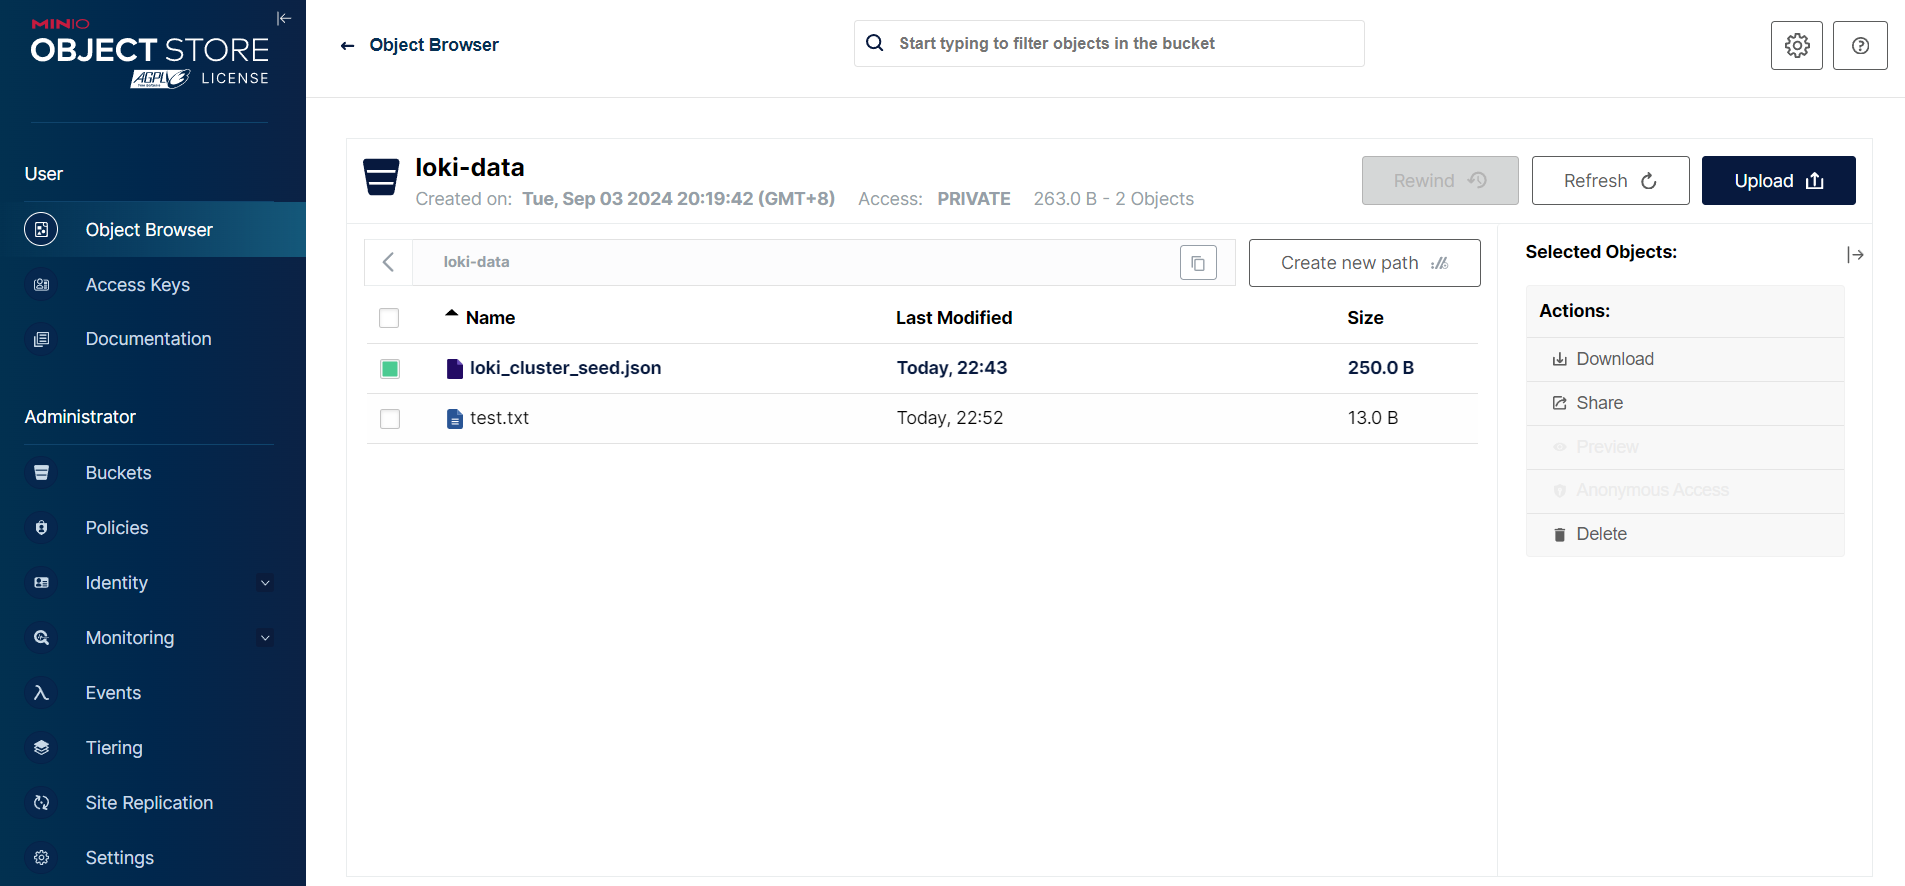
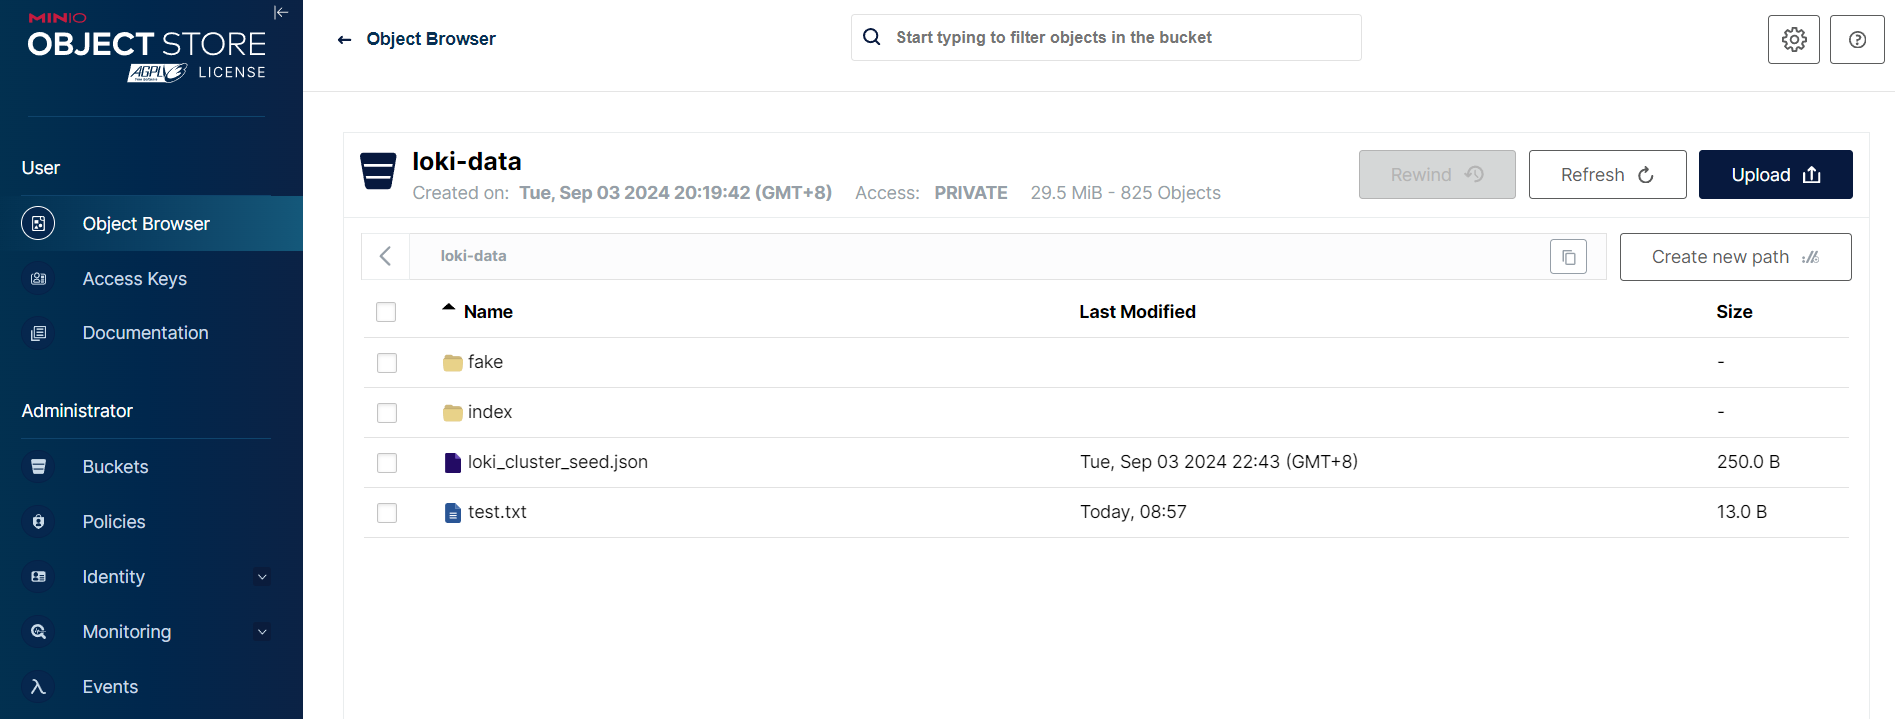
到这里可以看到数据已经可以正常写入了。
安装 Grafana
下面我们来验证下读取路径,安装 Grafana 对接 Loki:
$ helm pull grafana/grafana --untar
$ cd grafana创建如下所示的 values 配置文件:
# ci/simple-values.yaml
image:
  repository: registry.cn-beijing.aliyuncs.com/xxk8s/grafana
  tag: "8.4.2"
  sha: ""
  pullPolicy: IfNotPresent


service:
  enabled: true
  type: NodePort
  port: 80
  targetPort: 3000
  nodePort: 31392
  annotations: {}
  labels: {}
  portName: service

rbac:
  pspEnabled: false
persistence:
  enabled: true
  storageClassName: rook-ceph-block-test1
  accessModes:
    - ReadWriteOnce
  size: 10Gi
  image:
    repository: registry.cn-beijing.aliyuncs.com/xxk8s/busybox
    tag: "1.31.1"
    sha: ""
pullPolicy: IfNotPresent直接使用上面的 values 文件安装 Grafana:
$ helm upgrade --install loki-grafana -n loki-distributed -f simple-values.yaml .
root@master01:/k8s-logging/loki-Microservices/grafana# helm upgrade --install loki-grafana -n loki-distributed -f simple-values.yaml .
Release "loki-grafana" does not exist. Installing it now.
NAME: loki-grafana
LAST DEPLOYED: Wed Sep  4 09:04:29 2024
NAMESPACE: loki-distributed
STATUS: deployed
REVISION: 1
NOTES:
1. Get your 'admin' user password by running:

   kubectl get secret --namespace loki-distributed loki-grafana-grafana-loki -o jsonpath="{.data.admin-password}" | base64 --decode ; echo

2. The Grafana server can be accessed via port 80 on the following DNS name from within your cluster:

   loki-grafana-grafana-loki.loki-distributed.svc.cluster.local

   Get the Grafana URL to visit by running these commands in the same shell:
     export NODE_PORT=$(kubectl get --namespace loki-distributed -o jsonpath="{.spec.ports[0].nodePort}" services loki-grafana-grafana-loki)
     export NODE_IP=$(kubectl get nodes --namespace loki-distributed -o jsonpath="{.items[0].status.addresses[0].address}")
     echo http://$NODE_IP:$NODE_PORT

3. Login with the password from step 1 and the username: admin可以通过上面提示中的命令获取登录密码:
$ kubectl get secret --namespace loki-distributed liki-grafana -o jsonpath="{.data.admin-password}" | base64 --decode ; echo

$ kubectl get secret --namespace loki-distributed loki-grafana-grafana-loki -o jsonpath="{.data.admin-password}" | base64 --decode ; echo
UR4x9MfZfBDbX0XqfFhzqgr8MUa3Fe50avvMDQAl然后使用上面的密码和 admin 用户名登录 Grafana:
登录后进入 Grafana 添加一个数据源,这里需要注意要填写 gateway 的地址 http://loki-loki-distributed-gateway:
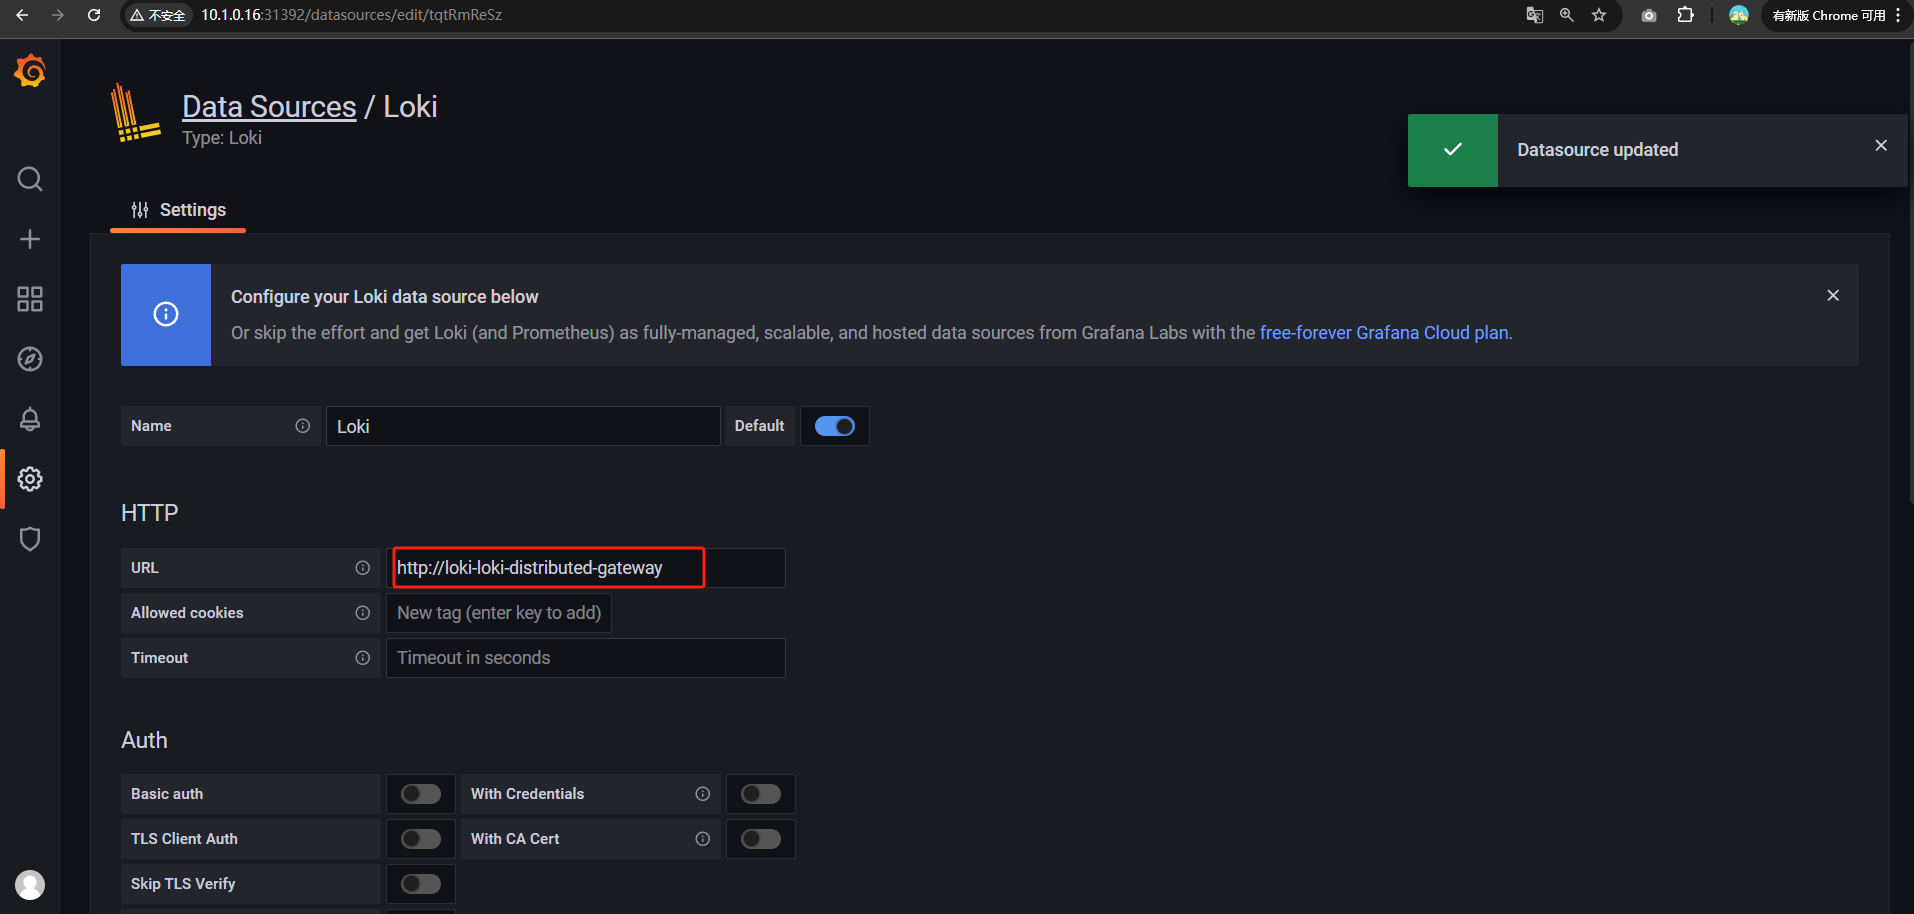
保存数据源后,可以进入 Explore 页面过滤日志,比如我们这里来实时查看 gateway 这个应用的日志,如下图所示:
如果你能看到最新的日志数据那说明我们部署成功了微服务模式的 Loki,这种模式灵活性非常高,可以根据需要对不同的组件做扩缩容,但是运维成本也会增加很多。
使用 Redis 缓存
上面虽然我们完成了 Loki 的微服务模式部署,当在海量日志数据的情况下我们可能需要启用缓存来提升查询性能。这里我们使用的 grafana/loki-distributed 这个 Chart 包可以为 Loki 使用的各种缓存配置 Memcached 实例,所有缓存的配置都相同,但是目前该包中的 Memcached 缓存方式还有一些问题,我们这里就以 redis 为例来配置缓存。
首先当然需要一个可用的 redis 服务,直接使用下面的资源清单部署 redis 应用。
# loki-redis.yaml
apiVersion: apps/v1
kind: Deployment
metadata:
  name: redis
  namespace: loki-distributed
spec:
  selector:
    matchLabels:
      app: redis
  template:
    metadata:
      labels:
        app: redis
    spec:
      containers:
        - name: redis
          image: registry.cn-beijing.aliyuncs.com/xxk8s/redis:4.0
          resources:
            requests:
              cpu: 500m
              memory: 2048Mi
          ports:
            - containerPort: 6379
        - name: redis-exporter # 它只会提供监控指标数据,主应用的metrics
          image: registry.cn-beijing.aliyuncs.com/xxk8s/redis_exporter:latest
          resources:
            requests:
              cpu: 500m
              memory: 512Mi
          ports:
            - containerPort: 9121
---
kind: Service
apiVersion: v1
metadata:
  name: redis
  namespace: loki-distributed
  labels:
    app: redis
spec:
  selector:
    app: redis
  ports:
    - name: redis
      port: 6379
      targetPort: 6379
    - name: prom
      port: 9121
      targetPort: 9121
---
apiVersion: monitoring.coreos.com/v1
kind: ServiceMonitor
metadata:
  name: redis
  namespace: loki-distributed
spec:
  endpoints:
    - port: prom
  selector:
    matchLabels:
app: redis部署完成后接下来我们为 Loki 集群添加 redis 缓存,定制如下所示的 values 文件:
# cache-values.yaml
loki:
  config: |
    auth_enabled: false

    server:
      http_listen_port: 3100

    distributor:
      ring:
        kvstore:
          store: memberlist

    memberlist:
      join_members:
        - {{ include "loki.fullname" . }}-memberlist

    ingester:
      lifecycler:
        ring:
          kvstore:
            store: memberlist
          replication_factor: 1
      chunk_idle_period: 30m
      chunk_block_size: 262144
      chunk_retain_period: 1m
      max_transfer_retries: 0
      wal:
        dir: /var/loki/wal

    limits_config:
      enforce_metric_name: false
      reject_old_samples: true
      reject_old_samples_max_age: 168h
      ingestion_burst_size_mb: 20
      ingestion_rate_mb: 10
      split_queries_by_interval: 24h

    schema_config:
      configs:
        - from: 2024-09-03
          store: boltdb-shipper
          object_store: filesystem
          schema: v12
          index:
            prefix: loki_index_
            period: 24h

    storage_config:
      aws:
        access_key_id: XmjSsr2lIIhww2GXYiIQ
        bucketnames: loki-data
        endpoint: loki-minio.loki-distributed.svc.cluster.local:9000
        insecure: true
        s3forcepathstyle: true
        secret_access_key: cjrN7LzFf6J6GXmh1OluOSwIBkNp6gUTu4Uag3t1
      boltdb_shipper:
        shared_store: filesystem
        active_index_directory: /var/loki/index
        cache_location: /var/loki/cache
        cache_ttl: 168h
      filesystem:
        directory: /var/loki/chunks
      index_queries_cache_config:
        redis:
          endpoint: redis:6379
          expiration: 1h

    chunk_store_config:
      max_look_back_period: 0
      chunk_cache_config:
        redis:
          endpoint: redis:6379
          expiration: 1h
      write_dedupe_cache_config:
        redis:
          endpoint: redis:6379
          expiration: 1h

    query_range:
      cache_results: true
      results_cache:
        cache:
          redis:
            endpoint: redis:6379
            expiration: 1h

    frontend_worker:
      frontend_address: {{ include "loki.queryFrontendFullname" . }}:9095

    frontend:
      log_queries_longer_than: 5s
      compress_responses: true

#    ruler:
#      storage:
#        type: local
#        local:
#          directory: /etc/loki/rules
#      ring:
#        kvstore:
#          store: memberlist
#      rule_path: /tmp/loki/scratch
#      alertmanager_url: http://alertmanager-main.monitoring.svc.cluster.local:9093  # alertmanager的地址
#      external_url: http://192.168.0.106:31918

distributor:
  replicas: 2

ingester: # WAL(replay)
  replicas: 2
  persistence:
    enabled: true
    size: 10Gi
    storageClass: rook-ceph-block-test1

querier:
  replicas: 2
  persistence:
    enabled: true
    size: 10Gi
    storageClass: rook-ceph-block-test1

queryFrontend:
  replicas: 2

gateway: # nginx容器 -> 路由日志写/读的请求
  nginxConfig:
    httpSnippet: |-
      client_max_body_size 100M;
    serverSnippet: |-
      client_max_body_size 100M;

#ruler:
#  enabled: true
#  kind: Deployment
#  replicas: 1
#  persistence:
#    enabled: true
#    size: 1Gi
#    storageClass: local-path
#  # -- Directories containing rules files
#  directories:
#    tenant_no:
#      rules1.txt: |
#        groups:
#          - name: nginx-rate
#            rules:
#            - alert: LokiNginxRate
#              expr: sum(rate({app="nginx"} |= "error" [1m])) by (job)
#                    /
#                  sum(rate({app="nginx"}[1m])) by (job)
#                    > 0.01
#              for: 1m
#              labels:
#                severity: critical
#              annotations:
#                summary: loki nginx rate
# description: high request latency上面的 values 中我们为 Loki 添加了一些缓存配置,核心配置如下所示:
......
query_range:
  results_cache:
    cache:
      redis:
        endpoint: redis:6379
        expiration: 1h
  cache_results: true
storage_config:
  index_queries_cache_config:
    redis:
      endpoint: redis:6379
      expiration: 1h
chunk_store_config:
  chunk_cache_config:
    redis:
      endpoint: redis:6379
      expiration: 1h
  write_dedupe_cache_config:
    redis:
      endpoint: redis:6379
      expiration: 1h
......直接使用上面的 values 重新覆盖 Loki 即可:
$ helm upgrade --install loki -n loki-distributed -f minio-values-cache.yaml .Release "loki" has been upgraded. Happy Helming!
NAME: loki
LAST DEPLOYED: Wed Sep 4 09:57:47 2024
NAMESPACE: loki-distributed
STATUS: deployed
REVISION: 2
TEST SUITE: None
NOTES:
***********************************************************************
Welcome to Grafana Loki
Chart version: 0.48.4
Loki version: 2.5.0
***********************************************************************
Installed components:
* gateway
* ingester
* distributor
* querier
* query-frontend安装完成后总体的 Pod 如下所示:
$ kubectl get pods -n logging
NAME                                                    READY   STATUS    RESTARTS        AGE
grafana-55d8779dc6-mm5f2                                1/1     Running   0               70m
loki-loki-distributed-distributor-77f8f99dbb-7snns      1/1     Running   0               38m
loki-loki-distributed-distributor-77f8f99dbb-rsn7l      1/1     Running   0               38m
loki-loki-distributed-gateway-6f4cfd898c-p9xxf          1/1     Running   2 (4h9m ago)    3d1h
loki-loki-distributed-ingester-0                        1/1     Running   0               37m
loki-loki-distributed-ingester-1                        1/1     Running   0               38m
loki-loki-distributed-querier-0                         1/1     Running   0               38m
loki-loki-distributed-querier-1                         1/1     Running   0               38m
loki-loki-distributed-query-frontend-78c4ccc99b-4t85w   1/1     Running   0               38m
loki-loki-distributed-query-frontend-78c4ccc99b-cgh8d   1/1     Running   0               38m
loki-loki-distributed-ruler-5654f8cf59-pjb8p            1/1     Running   0               38m
minio-548656f786-mjd4c                                  1/1     Running   3 (4h10m ago)   6d22h
promtail-ddz27                                          1/1     Running   1 (4h10m ago)   3d1h
promtail-lzr6v                                          1/1     Running   1 (4h10m ago)   3d1h
promtail-nldqx                                          1/1     Running   2 (4h4m ago)    3d1h
redis-7fb8ff6779-m26m6 2/2 Running 0 30mroot@master01:/k8s-logging/loki-Microservices/loki-distributed# kubectl get pods -n loki-distributed
NAME READY STATUS RESTARTS AGE
busybox-test-deployment-6df77c75c6-qqzjc 1/1 Running 12 (38m ago) 12h
busybox-test-pod 1/1 Running 12 (40m ago) 12h
hello-world-759d58894-7zfqj 1/1 Running 0 12h
hello-world-759d58894-bhl98 1/1 Running 0 12h
hello-world-759d58894-d77fd 1/1 Running 0 12h
hello-world-759d58894-kvq7n 1/1 Running 0 12h
hello-world-759d58894-t5zxv 1/1 Running 0 12h
loki-grafana-grafana-loki-564bcdc5b-6lfnv 1/1 Running 0 45m
loki-loki-distributed-distributor-6d99d468b6-cllhj 1/1 Running 0 84s
loki-loki-distributed-distributor-6d99d468b6-vj5n5 1/1 Running 0 44s
loki-loki-distributed-gateway-645c7c7d78-9jj7b 1/1 Running 0 11h
loki-loki-distributed-ingester-0 0/1 Running 0 21s
loki-loki-distributed-ingester-1 1/1 Running 0 82s
loki-loki-distributed-querier-0 1/1 Running 0 42s
loki-loki-distributed-querier-1 1/1 Running 0 83s
loki-loki-distributed-query-frontend-5d56bb797b-ddl5n 1/1 Running 0 76s
loki-loki-distributed-query-frontend-5d56bb797b-gq2l2 1/1 Running 0 84s
loki-minio-57f9fd44cd-pks42 1/1 Running 0 16h
minio-test-deployment-5bd997bf8c-zj9bf 0/1 CrashLoopBackOff 144 (36s ago) 11h
promtail-2-cd8hb 1/1 Running 0 11h
promtail-2-kfgl9 1/1 Running 0 11h
promtail-2-vz8sn 1/1 Running 0 11h
redis-5cf957bbdf-f9xc4 2/2 Running 0 33m查看 redis
grafana 中查看日志
正常现在 Redis 服务就已经再使用了,下图展示了 redis 的运行状态,可以看出压力也并不大。