ingress-nginx高级配置
作者: ryan 发布于: 8/17/2025 更新于: 8/17/2025 字数: 0 字 阅读: 0 分钟
Nginx 配置
如果我们还想进行一些自定义配置,则有几种方式可以实现:使用 Configmap 在 Nginx 中设置全局配置、通过 Ingress 的 Annotations 设置特定 Ingress 的规则、自定义模板。接下来我们重点给大家介绍使用注解来对 Ingress 对象进行自定义。
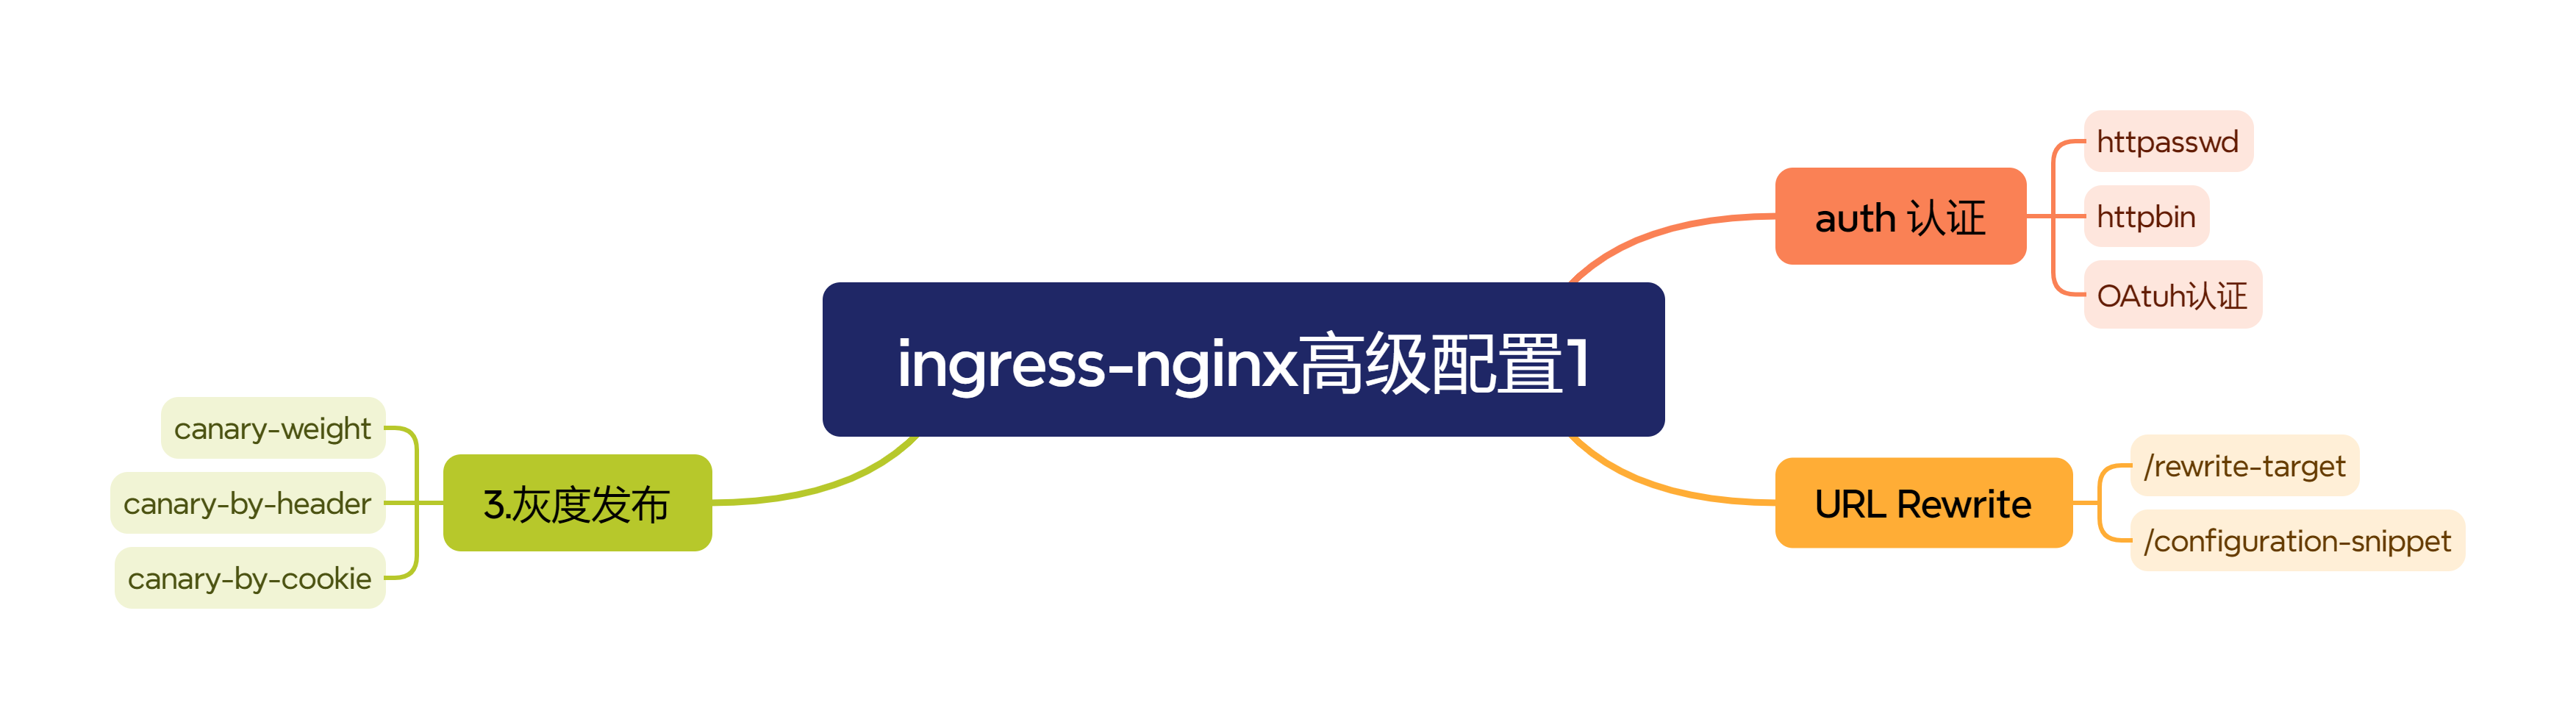
Basic Auth
我们可以在 Ingress 对象上配置一些基本的 Auth 认证,比如 Basic Auth,可以用 htpasswd 生成一个密码文件来验证身份验证。
$ htpasswd -c auth foo
New password:
Re-type new password:
Adding password for user foo然后根据上面的 auth 文件创建一个 secret 对象:
$ kubectl create secret generic basic-auth --from-file=auth
secret/basic-auth created
$ kubectl get secret basic-auth -o yaml
apiVersion: v1
data:
  auth: Zm9vOiRhcHIxJFUxYlFZTFVoJHdIZUZQQ1dyZTlGRFZONTQ0dXVQdC4K
kind: Secret
metadata:
  name: basic-auth
  namespace: default
type: Opaque然后对上面的 my-nginx 应用创建一个具有 Basic Auth 的 Ingress 对象:
apiVersion: networking.k8s.io/v1
kind: Ingress
metadata:
  name: ingress-with-auth
  namespace: default
  annotations:
    nginx.ingress.kubernetes.io/auth-type: basic # 认证类型
    nginx.ingress.kubernetes.io/auth-secret: basic-auth # 包含 user/password 定义的 secret 对象名
    nginx.ingress.kubernetes.io/auth-realm: 'Authentication Required - foo' # 要显示的带有适当上下文的消息,说明需要身份验证的原因
spec:
  ingressClassName: nginx # 使用 nginx 的 IngressClass(关联的 ingress-nginx 控制器)
  rules:
    - host: bauth.qikqiak.com # 将域名映射到 my-nginx 服务
      http:
        paths:
          - path: /
            pathType: Prefix
            backend:
              service: # 将所有请求发送到 my-nginx 服务的 80 端口
                name: my-nginx
                port:
number: 80直接创建上面的资源对象,然后通过下面的命令或者在浏览器中直接打开配置的域名:
$ kubectl get ingress
NAME                CLASS    HOSTS                        ADDRESS         PORTS   AGE
ingress-with-auth   nginx    bauth.qikqiak.com            192.168.31.31   80      6m55s
$ curl -v http://192.168.31.31 -H 'Host: bauth.qikqiak.com'
*   Trying 192.168.31.31...
* TCP_NODELAY set
* Connected to 192.168.31.31 (192.168.31.31) port 80 (#0)
> GET / HTTP/1.1
> Host: bauth.qikqiak.com
> User-Agent: curl/7.64.1
> Accept: */*
>
< HTTP/1.1 401 Unauthorized
< Date: Thu, 16 Dec 2021 10:49:03 GMT
< Content-Type: text/html
< Content-Length: 172
< Connection: keep-alive
< WWW-Authenticate: Basic realm="Authentication Required - foo"
<
<html>
<head><title>401 Authorization Required</title></head>
<body>
<center><h1>401 Authorization Required</h1></center>
<hr><center>nginx</center>
</body>
</html>
* Connection #0 to host 192.168.31.31 left intact
* Closing connection 0我们可以看到出现了 401 认证失败错误,然后带上我们配置的用户名和密码进行认证:
$ curl -v http://192.168.31.31 -H 'Host: bauth.qikqiak.com' -u 'foo:foo'
*   Trying 192.168.31.31...
* TCP_NODELAY set
* Connected to 192.168.31.31 (192.168.31.31) port 80 (#0)
* Server auth using Basic with user 'foo'
> GET / HTTP/1.1
> Host: bauth.qikqiak.com
> Authorization: Basic Zm9vOmZvbw==
> User-Agent: curl/7.64.1
> Accept: */*
>
< HTTP/1.1 200 OK
< Date: Thu, 16 Dec 2021 10:49:38 GMT
< Content-Type: text/html
< Content-Length: 615
< Connection: keep-alive
< Last-Modified: Tue, 02 Nov 2021 14:49:22 GMT
< ETag: "61814ff2-267"
< Accept-Ranges: bytes
<
<!DOCTYPE html>
<html>
<head>
<title>Welcome to nginx!</title>
<style>
html { color-scheme: light dark; }
body { width: 35em; margin: 0 auto;
font-family: Tahoma, Verdana, Arial, sans-serif; }
</style>
</head>
<body>
<h1>Welcome to nginx!</h1>
<p>If you see this page, the nginx web server is successfully installed and
working. Further configuration is required.</p>

<p>For online documentation and support please refer to
<a href="http://nginx.org/">nginx.org</a>.<br/>
Commercial support is available at
<a href="http://nginx.com/">nginx.com</a>.</p>

<p><em>Thank you for using nginx.</em></p>
</body>
</html>
* Connection #0 to host 192.168.31.31 left intact
* Closing connection 0可以看到已经认证成功了。除了可以使用我们自己在本地集群创建的 Auth 信息之外,还可以使用外部的 Basic Auth 认证信息,比如我们使用 https://httpbin.org 的外部 Basic Auth 认证,创建如下所示的 Ingress 资源对象:
apiVersion: networking.k8s.io/v1
kind: Ingress
metadata:
  annotations:
    # 配置外部认证服务地址
    nginx.ingress.kubernetes.io/auth-url: https://httpbin.org/basic-auth/user/passwd
  name: external-auth
  namespace: default
spec:
  ingressClassName: nginx
  rules:
    - host: external-bauth.qikqiak.com
      http:
        paths:
          - path: /
            pathType: Prefix
            backend:
              service:
                name: my-nginx
                port:
number: 80上面的资源对象创建完成后,再进行简单的测试:
$ kubectl get ingress
NAME                CLASS    HOSTS                        ADDRESS         PORTS   AGE
external-auth       <none>   external-bauth.qikqiak.com                   80      72s
$ curl -k http://192.168.31.31 -v -H 'Host: external-bauth.qikqiak.com'
*   Trying 192.168.31.31...
* TCP_NODELAY set
* Connected to 192.168.31.31 (192.168.31.31) port 80 (#0)
> GET / HTTP/1.1
> Host: external-bauth.qikqiak.com
> User-Agent: curl/7.64.1
> Accept: */*
>
< HTTP/1.1 401 Unauthorized
< Date: Thu, 16 Dec 2021 10:57:25 GMT
< Content-Type: text/html
< Content-Length: 172
< Connection: keep-alive
< WWW-Authenticate: Basic realm="Fake Realm"
<
<html>
<head><title>401 Authorization Required</title></head>
<body>
<center><h1>401 Authorization Required</h1></center>
<hr><center>nginx</center>
</body>
</html>
* Connection #0 to host 192.168.31.31 left intact
* Closing connection 0然后使用正确的用户名和密码测试:
$ curl -k http://192.168.31.31 -v -H 'Host: external-bauth.qikqiak.com' -u 'user:passwd'
*   Trying 192.168.31.31...
* TCP_NODELAY set
* Connected to 192.168.31.31 (192.168.31.31) port 80 (#0)
* Server auth using Basic with user 'user'
> GET / HTTP/1.1
> Host: external-bauth.qikqiak.com
> Authorization: Basic dXNlcjpwYXNzd2Q=
> User-Agent: curl/7.64.1
> Accept: */*
>
< HTTP/1.1 200 OK
< Date: Thu, 16 Dec 2021 10:58:31 GMT
< Content-Type: text/html
< Content-Length: 615
< Connection: keep-alive
< Last-Modified: Tue, 02 Nov 2021 14:49:22 GMT
< ETag: "61814ff2-267"
< Accept-Ranges: bytes
<
<!DOCTYPE html>
<html>
<head>
<title>Welcome to nginx!</title>
<style>
html { color-scheme: light dark; }
body { width: 35em; margin: 0 auto;
font-family: Tahoma, Verdana, Arial, sans-serif; }
</style>
</head>
<body>
<h1>Welcome to nginx!</h1>
<p>If you see this page, the nginx web server is successfully installed and
working. Further configuration is required.</p>

<p>For online documentation and support please refer to
<a href="http://nginx.org/">nginx.org</a>.<br/>
Commercial support is available at
<a href="http://nginx.com/">nginx.com</a>.</p>

<p><em>Thank you for using nginx.</em></p>
</body>
</html>
* Connection #0 to host 192.168.31.31 left intact
* Closing connection 0如果用户名或者密码错误则同样会出现 401 的状态码:
$ curl -k http://192.168.31.31 -v -H 'Host: external-bauth.qikqiak.com' -u 'user:passwd123'
*   Trying 192.168.31.31...
* TCP_NODELAY set
* Connected to 192.168.31.31 (192.168.31.31) port 80 (#0)
* Server auth using Basic with user 'user'
> GET / HTTP/1.1
> Host: external-bauth.qikqiak.com
> Authorization: Basic dXNlcjpwYXNzd2QxMjM=
> User-Agent: curl/7.64.1
> Accept: */*
>
< HTTP/1.1 401 Unauthorized
< Date: Thu, 16 Dec 2021 10:59:18 GMT
< Content-Type: text/html
< Content-Length: 172
< Connection: keep-alive
* Authentication problem. Ignoring this.
< WWW-Authenticate: Basic realm="Fake Realm"
<
<html>
<head><title>401 Authorization Required</title></head>
<body>
<center><h1>401 Authorization Required</h1></center>
<hr><center>nginx</center>
</body>
</html>
* Connection #0 to host 192.168.31.31 left intact
* Closing connection 0当然除了 Basic Auth 这一种简单的认证方式之外,ingress-nginx 还支持一些其他高级的认证,比如我们可以使用 GitHub OAuth 来认证 Kubernetes 的 Dashboard。
URL Rewrite
ingress-nginx 很多高级的用法可以通过 Ingress 对象的 annotation 进行配置,比如常用的 URL Rewrite 功能。很多时候我们会将 ingress-nginx 当成网关使用,比如对访问的服务加上 /app 这样的前缀,在 nginx 的配置里面我们知道有一个 proxy_pass 指令可以实现:
location /app/ {
  proxy_pass http://127.0.0.1/remote/;
}proxy_pass 后面加了 /remote 这个路径,此时会将匹配到该规则路径中的 /app 用 /remote 替换掉,相当于截掉路径中的 /app。同样的在 Kubernetes 中使用 ingress-nginx 又该如何来实现呢?我们可以使用 rewrite-target 的注解来实现这个需求,比如现在我们想要通过 rewrite.qikqiak.com/gateway/ 来访问到 Nginx 服务,则我们需要对访问的 URL 路径做一个 Rewrite,在 PATH 中添加一个 gateway 的前缀,关于 Rewrite 的操作在 ingress-nginx 官方文档中也给出对应的说明:
按照要求我们需要在 path 中匹配前缀 gateway,然后通过 rewrite-target 指定目标,Ingress 对象如下所示:
apiVersion: networking.k8s.io/v1
kind: Ingress
metadata:
  name: rewrite
  annotations:
    nginx.ingress.kubernetes.io/rewrite-target: /$2
spec:
  ingressClassName: nginx
  rules:
    - host: rewrite.qikqiak.com
      http:
        paths:
          - path: /gateway(/|$)(.*)
            pathType: Prefix
            backend:
              service:
                name: my-nginx
                port:
number: 80更新后,我们可以预见到直接访问域名肯定是不行了,因为我们没有匹配 / 的 path 路径:
$ curl rewrite.qikqiak.com
default backend - 404但是我们带上 gateway 的前缀再去访问:
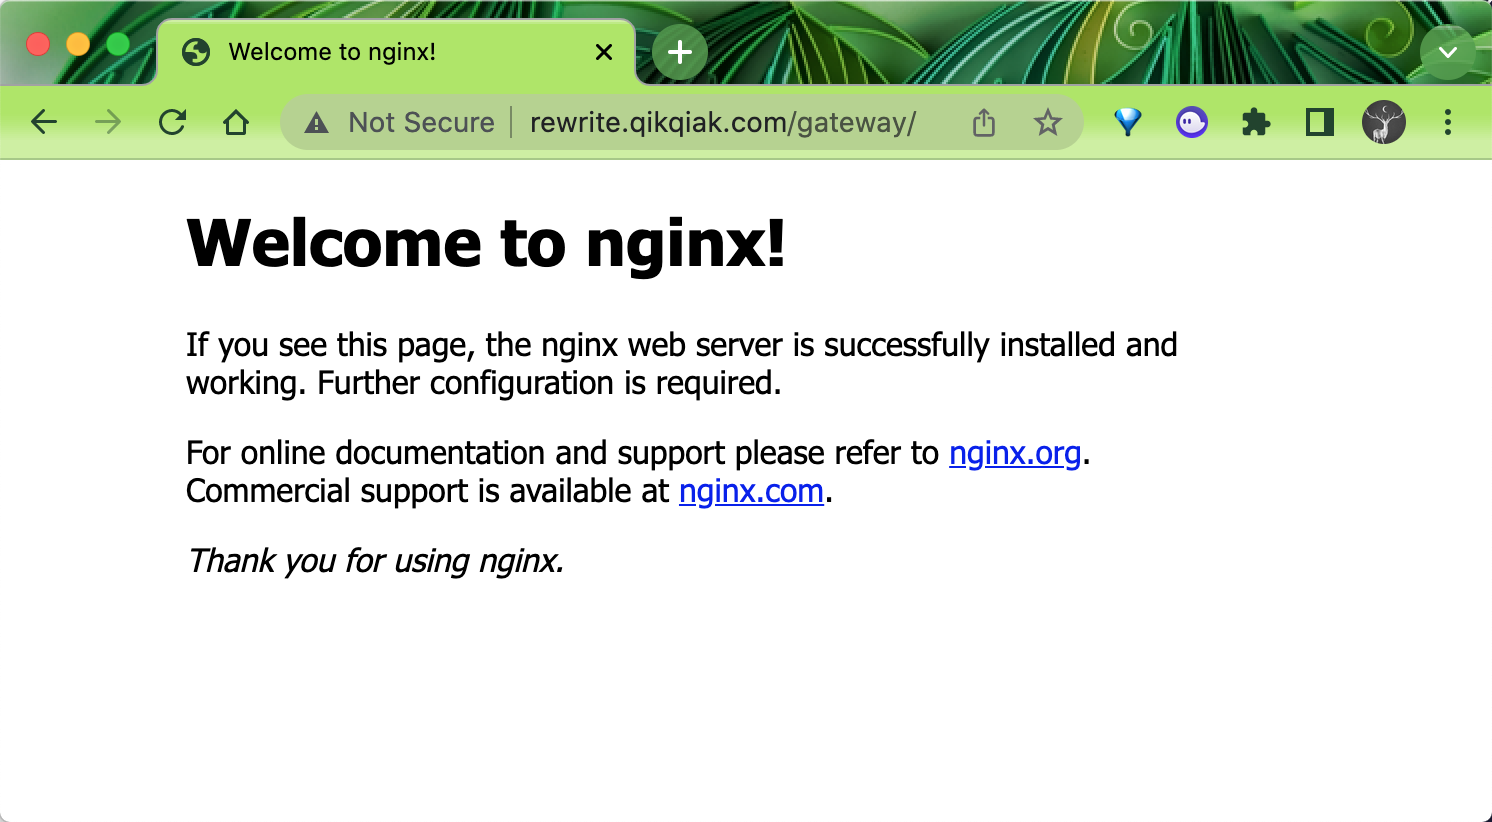
我们可以看到已经可以访问到了,这是因为我们在 path 中通过正则表达式 /gateway(/|$)(.*) 将匹配的路径设置成了 rewrite-target 的目标路径了,所以我们访问 rewite.qikqiak.com/gateway/ 的时候实际上相当于访问的就是后端服务的 / 路径。
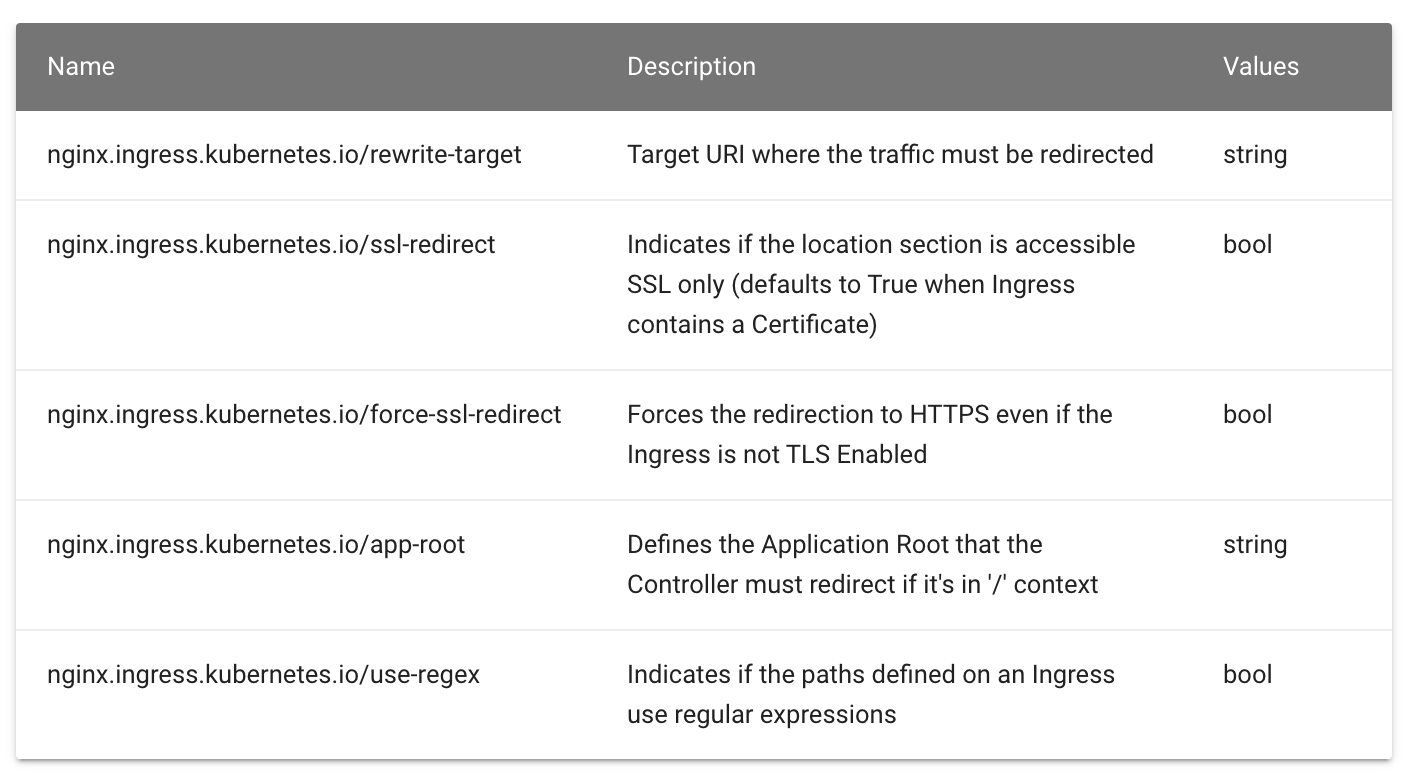
要解决我们访问主域名出现 404 的问题,我们可以给应用设置一个 app-root 的注解,这样当我们访问主域名的时候会自动跳转到我们指定的 app-root 目录下面,如下所示:
apiVersion: networking.k8s.io/v1
kind: Ingress
metadata:
  name: rewrite
  annotations:
    nginx.ingress.kubernetes.io/app-root: /gateway/
    nginx.ingress.kubernetes.io/rewrite-target: /$2
spec:
  ingressClassName: nginx
  rules:
    - host: rewrite.qikqiak.com
      http:
        paths:
          - path: /gateway(/|$)(.*)
            pathType: Prefix
            backend:
              service:
                name: my-nginx
                port:
number: 80这个时候我们更新应用后访问主域名 rewrite.qikqiak.com 就会自动跳转到 rewrite.qikqiak.com/gateway/ 路径下面去了。但是还有一个问题是我们的 path 路径其实也匹配了 /app 这样的路径,可能我们更加希望我们的应用在最后添加一个 / 这样的 slash,同样我们可以通过 configuration-snippet 配置来完成,如下 Ingress 对象:
apiVersion: networking.k8s.io/v1
kind: Ingress
metadata:
  name: rewrite
  annotations:
    nginx.ingress.kubernetes.io/app-root: /gateway/
    nginx.ingress.kubernetes.io/rewrite-target: /$2
    nginx.ingress.kubernetes.io/configuration-snippet: |
      rewrite ^(/gateway)$ $1/ redirect;
spec:
  ingressClassName: nginx
  rules:
    - host: rewrite.qikqiak.com
      http:
        paths:
          - path: /gateway(/|$)(.*)
            pathType: Prefix
            backend:
              service:
                name: my-nginx
                port:
number: 80更新后我们的应用就都会以 / 这样的 slash 结尾了。这样就完成了我们的需求,如果你原本对 nginx 的配置就非常熟悉的话应该可以很快就能理解这种配置方式了。
灰度发布
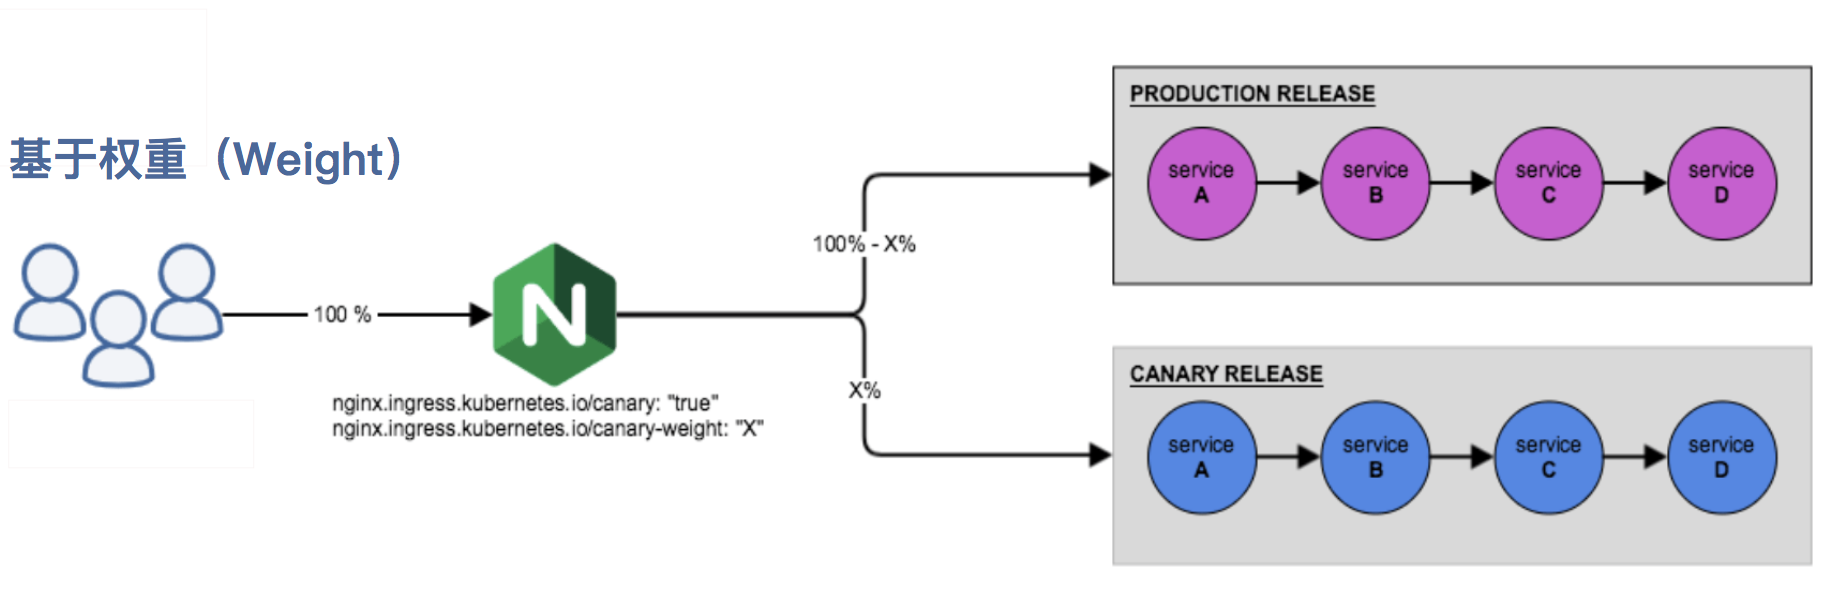
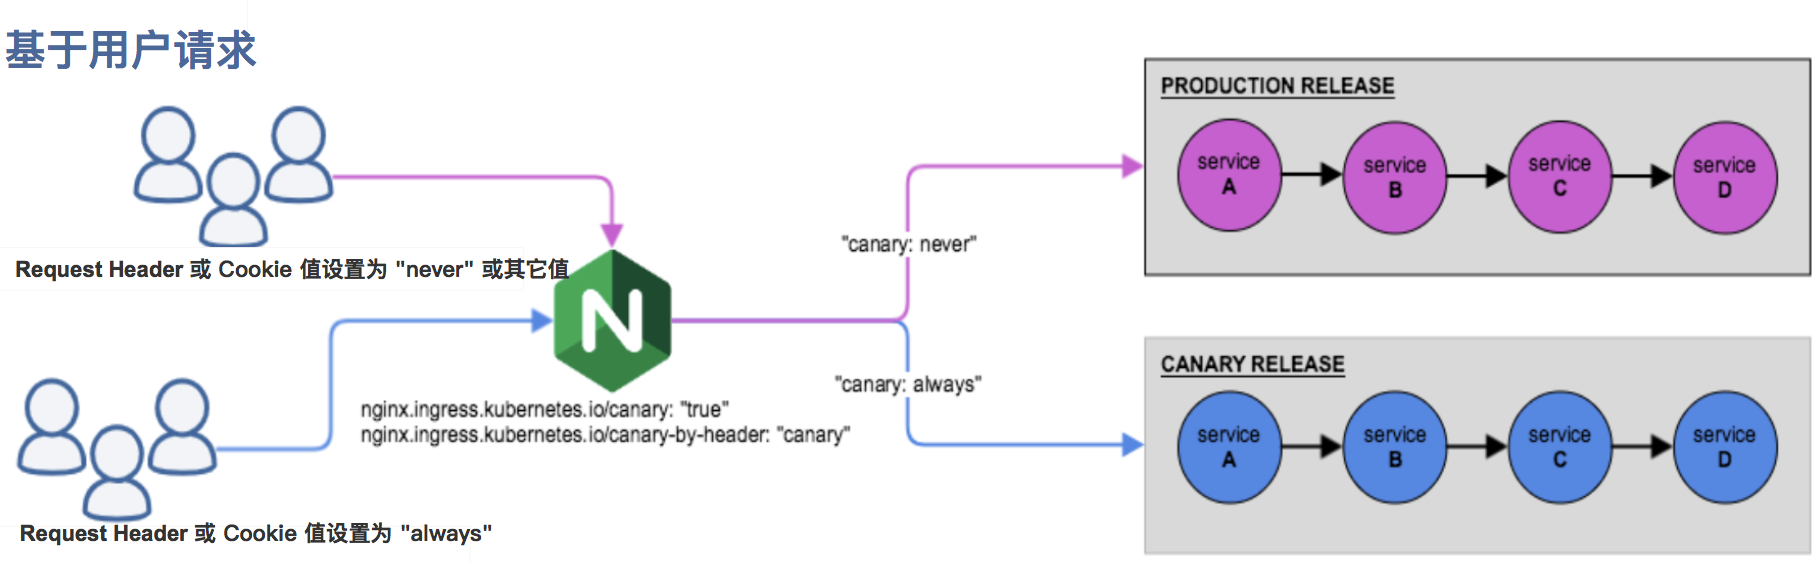
在日常工作中我们经常需要对服务进行版本更新升级,所以我们经常会使用到滚动升级、蓝绿发布、灰度发布等不同的发布操作。而 ingress-nginx 支持通过 Annotations 配置来实现不同场景下的灰度发布和测试,可以满足金丝雀发布、蓝绿部署与 A/B 测试等业务场景。
ingress-nginx 的 Annotations 支持以下 4 种 Canary 规则:
nginx.ingress.kubernetes.io/canary-by-header:基于 Request Header 的流量切分,适用于灰度发布以及 A/B 测试。当 Request Header 设置为 always 时,请求将会被一直发送到 Canary 版本;当 Request Header 设置为 never 时,请求不会被发送到 Canary 入口;对于任何其他 Header 值,将忽略 Header,并通过优先级将请求与其他金丝雀规则进行优先级的比较。nginx.ingress.kubernetes.io/canary-by-header-value:要匹配的 Request Header 的值,用于通知 Ingress 将请求路由到 Canary Ingress 中指定的服务。当 Request Header 设置为此值时,它将被路由到 Canary 入口。该规则允许用户自定义 Request Header 的值,必须与上一个 annotation (canary-by-header) 一起使用。nginx.ingress.kubernetes.io/canary-weight:基于服务权重的流量切分,适用于蓝绿部署,权重范围 0 - 100 按百分比将请求路由到 Canary Ingress 中指定的服务。权重为 0 意味着该金丝雀规则不会向 Canary 入口的服务发送任何请求,权重为 100 意味着所有请求都将被发送到 Canary 入口。nginx.ingress.kubernetes.io/canary-by-cookie:基于 cookie 的流量切分,适用于灰度发布与 A/B 测试。用于通知 Ingress 将请求路由到 Canary Ingress 中指定的服务的 cookie。当 cookie 值设置为 always 时,它将被路由到 Canary 入口;当 cookie 值设置为 never 时,请求不会被发送到 Canary 入口;对于任何其他值,将忽略 cookie 并将请求与其他金丝雀规则进行优先级的比较。
需要注意的是金丝雀规则按优先顺序进行排序:canary-by-header - > canary-by-cookie - > canary-weight
总的来说可以把以上的四个 annotation 规则划分为以下两类:
- 基于权重的 Canary 规则
- 基于用户请求的 Canary 规则
下面我们通过一个示例应用来对灰度发布功能进行说明。
第一步. 部署 Production 应用
首先创建一个 production 环境的应用资源清单:
# production.yaml
apiVersion: apps/v1
kind: Deployment
metadata:
  name: production
  labels:
    app: production
spec:
  selector:
    matchLabels:
      app: production
  template:
    metadata:
      labels:
        app: production
    spec:
      containers:
        - name: production
          image: cnych/echoserver
          ports:
            - containerPort: 8080
          env:
            - name: NODE_NAME
              valueFrom:
                fieldRef:
                  fieldPath: spec.nodeName
            - name: POD_NAME
              valueFrom:
                fieldRef:
                  fieldPath: metadata.name
            - name: POD_NAMESPACE
              valueFrom:
                fieldRef:
                  fieldPath: metadata.namespace
            - name: POD_IP
              valueFrom:
                fieldRef:
                  fieldPath: status.podIP
---
apiVersion: v1
kind: Service
metadata:
  name: production
  labels:
    app: production
spec:
  ports:
    - port: 80
      targetPort: 8080
      name: http
  selector:
app: production然后创建一个用于 production 环境访问的 Ingress 资源对象:
# production-ingress.yaml
apiVersion: networking.k8s.io/v1
kind: Ingress
metadata:
  name: production
spec:
  ingressClassName: nginx
  rules:
    - host: echo.qikqiak.com
      http:
        paths:
          - path: /
            pathType: Prefix
            backend:
              service:
                name: production
                port:
number: 80直接创建上面的几个资源对象:
$ kubectl apply -f production.yaml
$ kubectl apply -f production-ingress.yaml
$ kubectl get pods -l app=production
NAME                         READY   STATUS    RESTARTS   AGE
production-856d5fb99-d6bds   1/1     Running   0          2m50s
$ kubectl get ingress
NAME         CLASS    HOSTS                ADDRESS        PORTS   AGE
production <none> echo.qikqiak.com 10.151.30.11 80 90s应用部署成功后,将域名 echo.qikqiak.com 映射到 master1 节点(ingress-nginx 所在的节点)的 IP 即可正常访问应用:
$ curl http://echo.qikqiak.com

Hostname: production-856d5fb99-d6bds

Pod Information:
    node name:  node1
    pod name:   production-856d5fb99-d6bds
    pod namespace:  default
    pod IP: 10.244.1.111

Server values:
    server_version=nginx: 1.13.3 - lua: 10008

Request Information:
    client_address=10.244.0.0
    method=GET
    real path=/
    query=
    request_version=1.1
    request_scheme=http
    request_uri=http://echo.qikqiak.com:8080/

Request Headers:
    accept=*/*
    host=echo.qikqiak.com
    user-agent=curl/7.64.1
    x-forwarded-for=171.223.99.184
    x-forwarded-host=echo.qikqiak.com
    x-forwarded-port=80
    x-forwarded-proto=http
    x-real-ip=171.223.99.184
    x-request-id=e680453640169a7ea21afba8eba9e116
    x-scheme=http

Request Body:
-no body in request-第二步. 创建 Canary 版本 参考将上述 Production 版本的 production.yaml 文件,再创建一个 Canary 版本的应用。
# canary.yaml
apiVersion: apps/v1
kind: Deployment
metadata:
  name: canary
  labels:
    app: canary
spec:
  selector:
    matchLabels:
      app: canary
  template:
    metadata:
      labels:
        app: canary
    spec:
      containers:
        - name: canary
          image: cnych/echoserver
          ports:
            - containerPort: 8080
          env:
            - name: NODE_NAME
              valueFrom:
                fieldRef:
                  fieldPath: spec.nodeName
            - name: POD_NAME
              valueFrom:
                fieldRef:
                  fieldPath: metadata.name
            - name: POD_NAMESPACE
              valueFrom:
                fieldRef:
                  fieldPath: metadata.namespace
            - name: POD_IP
              valueFrom:
                fieldRef:
                  fieldPath: status.podIP
---
apiVersion: v1
kind: Service
metadata:
  name: canary
  labels:
    app: canary
spec:
  ports:
    - port: 80
      targetPort: 8080
      name: http
  selector:
app: canary接下来就可以通过配置 Annotation 规则进行流量切分了。
第三步. Annotation 规则配置
- 基于权重:基于权重的流量切分的典型应用场景就是蓝绿部署,可通过将权重设置为 0 或 100 来实现。例如,可将 Green 版本设置为主要部分,并将 Blue 版本的入口配置为 Canary。最初,将权重设置为 0,因此不会将流量代理到 Blue 版本。一旦新版本测试和验证都成功后,即可将 Blue 版本的权重设置为 100,即所有流量从 Green 版本转向 Blue。
创建一个基于权重的 Canary 版本的应用路由 Ingress 对象。
# canary-ingress.yaml
apiVersion: networking.k8s.io/v1
kind: Ingress
metadata:
  name: canary
  annotations:
    nginx.ingress.kubernetes.io/canary: 'true' # 要开启灰度发布机制,首先需要启用 Canary
    nginx.ingress.kubernetes.io/canary-weight: '30' # 分配30%流量到当前Canary版本
spec:
  ingressClassName: nginx
  rules:
    - host: echo.qikqiak.com
      http:
        paths:
          - path: /
            pathType: Prefix
            backend:
              service:
                name: canary
                port:
number: 80直接创建上面的资源对象即可:
$ kubectl apply -f canary.yaml
$ kubectl apply -f canary-ingress.yaml
$ kubectl get pods
NAME                         READY   STATUS    RESTARTS   AGE
canary-66cb497b7f-48zx4      1/1     Running   0          7m48s
production-856d5fb99-d6bds   1/1     Running   0          21m
......
$ kubectl get svc
NAME                       TYPE        CLUSTER-IP       EXTERNAL-IP   PORT(S)                      AGE
canary                     ClusterIP   10.106.91.106    <none>        80/TCP                       8m23s
production                 ClusterIP   10.105.182.15    <none>        80/TCP                       22m
......
$ kubectl get ingress
NAME         CLASS    HOSTS                ADDRESS        PORTS   AGE
canary       <none>   echo.qikqiak.com     10.151.30.11   80      108s
production <none> echo.qikqiak.com 10.151.30.11 80 22mCanary 版本应用创建成功后,接下来我们在命令行终端中来不断访问这个应用,观察 Hostname 变化:
$ for i in $(seq 1 10); do curl -s echo.qikqiak.com | grep "Hostname"; done
Hostname: production-856d5fb99-d6bds
Hostname: canary-66cb497b7f-48zx4
Hostname: production-856d5fb99-d6bds
Hostname: production-856d5fb99-d6bds
Hostname: production-856d5fb99-d6bds
Hostname: production-856d5fb99-d6bds
Hostname: production-856d5fb99-d6bds
Hostname: canary-66cb497b7f-48zx4
Hostname: canary-66cb497b7f-48zx4
Hostname: production-856d5fb99-d6bds由于我们给 Canary 版本应用分配了 30% 左右权重的流量,所以上面我们访问 10 次有 3 次访问到了 Canary 版本的应用,符合我们的预期。
- 基于 Request Header: 基于 Request Header 进行流量切分的典型应用场景即灰度发布或 A/B 测试场景。
在上面的 Canary 版本的 Ingress 对象中新增一条 annotation 配置 nginx.ingress.kubernetes.io/canary-by-header: canary(这里的 value 可以是任意值),使当前的 Ingress 实现基于 Request Header 进行流量切分,由于 canary-by-header 的优先级大于 canary-weight,所以会忽略原有的 canary-weight 的规则。
annotations:
  nginx.ingress.kubernetes.io/canary: 'true' # 要开启灰度发布机制,首先需要启用 Canary
  nginx.ingress.kubernetes.io/canary-by-header: canary # 基于header的流量切分
nginx.ingress.kubernetes.io/canary-weight: '30' # 会被忽略,因为配置了 canary-by-headerCanary版本更新上面的 Ingress 资源对象后,我们在请求中加入不同的 Header 值,再次访问应用的域名。
注意:当 Request Header 设置为 never 或 always 时,请求将不会或一直被发送到 Canary 版本,对于任何其他 Header 值,将忽略 Header,并通过优先级将请求与其他 Canary 规则进行优先级的比较。
$ for i in $(seq 1 10); do curl -s -H "canary: never" echo.qikqiak.com | grep "Hostname"; done
Hostname: production-856d5fb99-d6bds
Hostname: production-856d5fb99-d6bds
Hostname: production-856d5fb99-d6bds
Hostname: production-856d5fb99-d6bds
Hostname: production-856d5fb99-d6bds
Hostname: production-856d5fb99-d6bds
Hostname: production-856d5fb99-d6bds
Hostname: production-856d5fb99-d6bds
Hostname: production-856d5fb99-d6bds
Hostname: production-856d5fb99-d6bds这里我们在请求的时候设置了 canary: never 这个 Header 值,所以请求没有发送到 Canary 应用中去。如果设置为其他值呢:
$ for i in $(seq 1 10); do curl -s -H "canary: other-value" echo.qikqiak.com | grep "Hostname"; done
Hostname: production-856d5fb99-d6bds
Hostname: production-856d5fb99-d6bds
Hostname: canary-66cb497b7f-48zx4
Hostname: production-856d5fb99-d6bds
Hostname: production-856d5fb99-d6bds
Hostname: production-856d5fb99-d6bds
Hostname: production-856d5fb99-d6bds
Hostname: canary-66cb497b7f-48zx4
Hostname: production-856d5fb99-d6bds
Hostname: canary-66cb497b7f-48zx4由于我们请求设置的 Header 值为 canary: other-value,所以 ingress-nginx 会通过优先级将请求与其他 Canary 规则进行优先级的比较,我们这里也就会进入 canary-weight: "30" 这个规则去。
这个时候我们可以在上一个 annotation (即 canary-by-header)的基础上添加一条 nginx.ingress.kubernetes.io/canary-by-header-value: user-value 这样的规则,就可以将请求路由到 Canary Ingress 中指定的服务了。
annotations:
  nginx.ingress.kubernetes.io/canary: 'true' # 要开启灰度发布机制,首先需要启用 Canary
  nginx.ingress.kubernetes.io/canary-by-header-value: user-value
  nginx.ingress.kubernetes.io/canary-by-header: canary # 基于header的流量切分
nginx.ingress.kubernetes.io/canary-weight: '30' # 分配30%流量到当前Canary版本同样更新 Ingress 对象后,重新访问应用,当 Request Header 满足 canary: user-value时,所有请求就会被路由到 Canary 版本:
$ for i in $(seq 1 10); do curl -s -H "canary: user-value" echo.qikqiak.com | grep "Hostname"; done
Hostname: canary-66cb497b7f-48zx4
Hostname: canary-66cb497b7f-48zx4
Hostname: canary-66cb497b7f-48zx4
Hostname: canary-66cb497b7f-48zx4
Hostname: canary-66cb497b7f-48zx4
Hostname: canary-66cb497b7f-48zx4
Hostname: canary-66cb497b7f-48zx4
Hostname: canary-66cb497b7f-48zx4
Hostname: canary-66cb497b7f-48zx4
Hostname: canary-66cb497b7f-48zx4- 基于 Cookie:与基于 Request Header 的 annotation 用法规则类似。例如在 A/B 测试场景下,需要让地域为北京的用户访问 Canary 版本。那么当 cookie 的 annotation 设置为 nginx.ingress.kubernetes.io/canary-by-cookie: "users_from_Beijing",此时后台可对登录的用户请求进行检查,如果该用户访问源来自北京则设置 cookie users_from_Beijing 的值为 always,这样就可以确保北京的用户仅访问 Canary 版本。
同样我们更新 Canary 版本的 Ingress 资源对象,采用基于 Cookie 来进行流量切分,
annotations:
  nginx.ingress.kubernetes.io/canary: 'true' # 要开启灰度发布机制,首先需要启用 Canary
  nginx.ingress.kubernetes.io/canary-by-cookie: 'users_from_Beijing' # 基于 cookie
nginx.ingress.kubernetes.io/canary-weight: '30' # 会被忽略,因为配置了 canary-by-cookie更新上面的 Ingress 资源对象后,我们在请求中设置一个 users_from_Beijing=always 的 Cookie 值,再次访问应用的域名。
$ for i in $(seq 1 10); do curl -s -b "users_from_Beijing=always" echo.qikqiak.com | grep "Hostname"; done
Hostname: canary-66cb497b7f-48zx4
Hostname: canary-66cb497b7f-48zx4
Hostname: canary-66cb497b7f-48zx4
Hostname: canary-66cb497b7f-48zx4
Hostname: canary-66cb497b7f-48zx4
Hostname: canary-66cb497b7f-48zx4
Hostname: canary-66cb497b7f-48zx4
Hostname: canary-66cb497b7f-48zx4
Hostname: canary-66cb497b7f-48zx4
Hostname: canary-66cb497b7f-48zx4我们可以看到应用都被路由到了 Canary 版本的应用中去了,如果我们将这个 Cookie 值设置为 never,则不会路由到 Canary 应用中。