Helm 测试与包共享
作者: ryan 发布于: 8/13/2025 更新于: 8/13/2025 字数: 0 字 阅读: 0 分钟
增加更改更新策略
除了上面的这些主要的需求之外,还有一些额外的定制需求,比如用户想要配置更新策略,因为更新策略并不是一层不变的,这里和之前不太一样,我们需要用到一个新的函数 toYaml:
{{- if .Values.updateStrategy }}
strategy: {{ toYaml .Values.updateStrategy | nindent 4 }}
{{- end }}意思就是我们将 updateStrategy 这个 Values 值转换成 YAML 格式,并保留4个空格。
增加容忍
添加其他的配置,比如是否需要添加 nodeSelector、容忍、亲和性这些,这里我们都是使用 toYaml 函数来控制空格,如下所示:
{{- if .Values.nodeSelector }}
nodeSelector: {{- toYaml .Values.nodeSelector | nindent 8 }}
{{- end -}}
{{- with .Values.affinity }}
affinity: {{- toYaml . | nindent 8 }}
{{- end }}
{{- with .Values.tolerations }}
tolerations: {{- toYaml . | nindent 8 }}
{{- end }}使用 toYaml 和 indent 2 来处理缩进:
toYaml 函数将 .Values.affinity 对象转换为 YAML 格式的字符串,并保持内部结构的缩进。
indent 2 则将整个 affinity 配置块向右缩进2个空格。
增加镜像仓库 Secret
接下来当然就是镜像的配置了,如果是私有仓库还需要指定 imagePullSecrets:
{{- if .Values.image.pullSecrets }}
imagePullSecrets:
{{- range .Values.image.pullSecrets }}
- name: {{ . }}
{{- end }}
{{- end }}
containers:
- name: ghost
  image: {{ printf "%s:%s" .Values.image.name .Values.image.tag }}
  imagePullPolicy: {{ .Values.image.pullPolicy | quote }}
  ports:
- containerPort: 2368对应的 Values 值如下所示:
image:
  name: ghost
  tag: latest
  pullPolicy: IfNotPresent
  ## 如果是私有仓库,需要指定 imagePullSecrets
  # pullSecrets:
# - myRegistryKeySecretName然后就是 resource 资源声明,这里我们定义一个默认的 resources 值,同样用 toYaml 函数来控制空格:
resources:
{{ toYaml .Values.resources | indent 10 }}增加探针模板
最后是健康检查部分,虽然我们之前没有做 livenessProbe,但是我们开发 Chart 模板的时候就要尽可能考虑周全一点,这里我们加上存活性和可读性、启动三个探针,并且根据 livenessProbe.enabled 、readinessProbe.enabled 以及 startupProbe.enabled 三个 Values 值来判断是否需要添加探针,探针对应的参数也都通过 Values 值来配置:
{{- if .Values.startupProbe.enabled }}
startupProbe:
  httpGet:
    path: /
    port: 2368
  initialDelaySeconds: {{ .Values.startupProbe.initialDelaySeconds }}
  periodSeconds: {{ .Values.startupProbe.periodSeconds }}
  timeoutSeconds: {{ .Values.startupProbe.timeoutSeconds }}
  failureThreshold: {{ .Values.startupProbe.failureThreshold }}
  successThreshold: {{ .Values.startupProbe.successThreshold }}
{{- end }}
{{- if .Values.livenessProbe.enabled }}
livenessProbe:
  httpGet:
    path: /
    port: 2368
  initialDelaySeconds: {{ .Values.livenessProbe.initialDelaySeconds }}
  periodSeconds: {{ .Values.livenessProbe.periodSeconds }}
  timeoutSeconds: {{ .Values.livenessProbe.timeoutSeconds }}
  failureThreshold: {{ .Values.livenessProbe.failureThreshold }}
  successThreshold: {{ .Values.livenessProbe.successThreshold }}
{{- end }}
{{- if .Values.readinessProbe.enabled }}
readinessProbe:
  httpGet:
    path: /
    port: 2368
  initialDelaySeconds: {{ .Values.readinessProbe.initialDelaySeconds }}
  periodSeconds: {{ .Values.readinessProbe.periodSeconds }}
  timeoutSeconds: {{ .Values.readinessProbe.timeoutSeconds }}
  failureThreshold: {{ .Values.readinessProbe.failureThreshold }}
  successThreshold: {{ .Values.readinessProbe.successThreshold }}
{{- end }}默认的 values.yaml 文件如下所示:
replicaCount: 1
image:
  name: ghost
  tag: latest
  pullPolicy: IfNotPresent

node_env: production
url: ghost.k8s.local

service:
  type: ClusterIP
  port: 80

ingress:
  enabled: true
  ingressClass: nginx

## 是否使用 PVC 开启数据持久化
persistence:
  enabled: true
  ## 是否使用 storageClass,如果不适用则补配置
  # storageClass: "xxx"
  ##
  ## 如果想使用一个存在的 PVC 对象,则直接传递给下面的 existingClaim 变量
  # existingClaim: your-claim
  accessMode: ReadWriteOnce  # 访问模式
  size: 1Gi  # 存储容量

nodeSelector: {}

affinity: {}

tolerations: {}

resources: {}

startupProbe:
  enabled: false

livenessProbe:
  enabled: false

readinessProbe:
enabled: false验证Charts 包
现在我们再去更新 Release:
$ helm upgrade --install my-ghost ./my-ghost -n default
Release "my-ghost" has been upgraded. Happy Helming!
NAME: my-ghost
LAST DEPLOYED: Tue Jul 16 21:32:53 2024
NAMESPACE: default
STATUS: deployed
REVISION: 1
TEST SUITE: None

$ helm ls -n default
NAME            NAMESPACE       REVISION        UPDATED                                 STATUS          CHART           APP VERSION
my-ghost        default         1               2024-07-16 21:32:53.509865463 +0800 CST deployed        my-ghost-0.1.0  1.16.0

$ kubectl get pods -n default
NAME                        READY   STATUS    RESTARTS   AGE
my-ghost-69d8995464-n2h6r   1/1     Running   0          2m46s

$ kubectl get pvc -n default
NAME      STATUS   VOLUME   CAPACITY   ACCESS MODES   STORAGECLASS   AGE
my-ghost  Bound  pvc-ed6232e2-96ba-4948-a462-c2b57faefb10  1Gi    RWO   longhorn   92s

$ kubectl get ingress -n default
NAME       CLASS   HOSTS             ADDRESS        PORTS   AGE
my-ghost   nginx   ghost.k8s.local   192.168.18.7   80      2m31s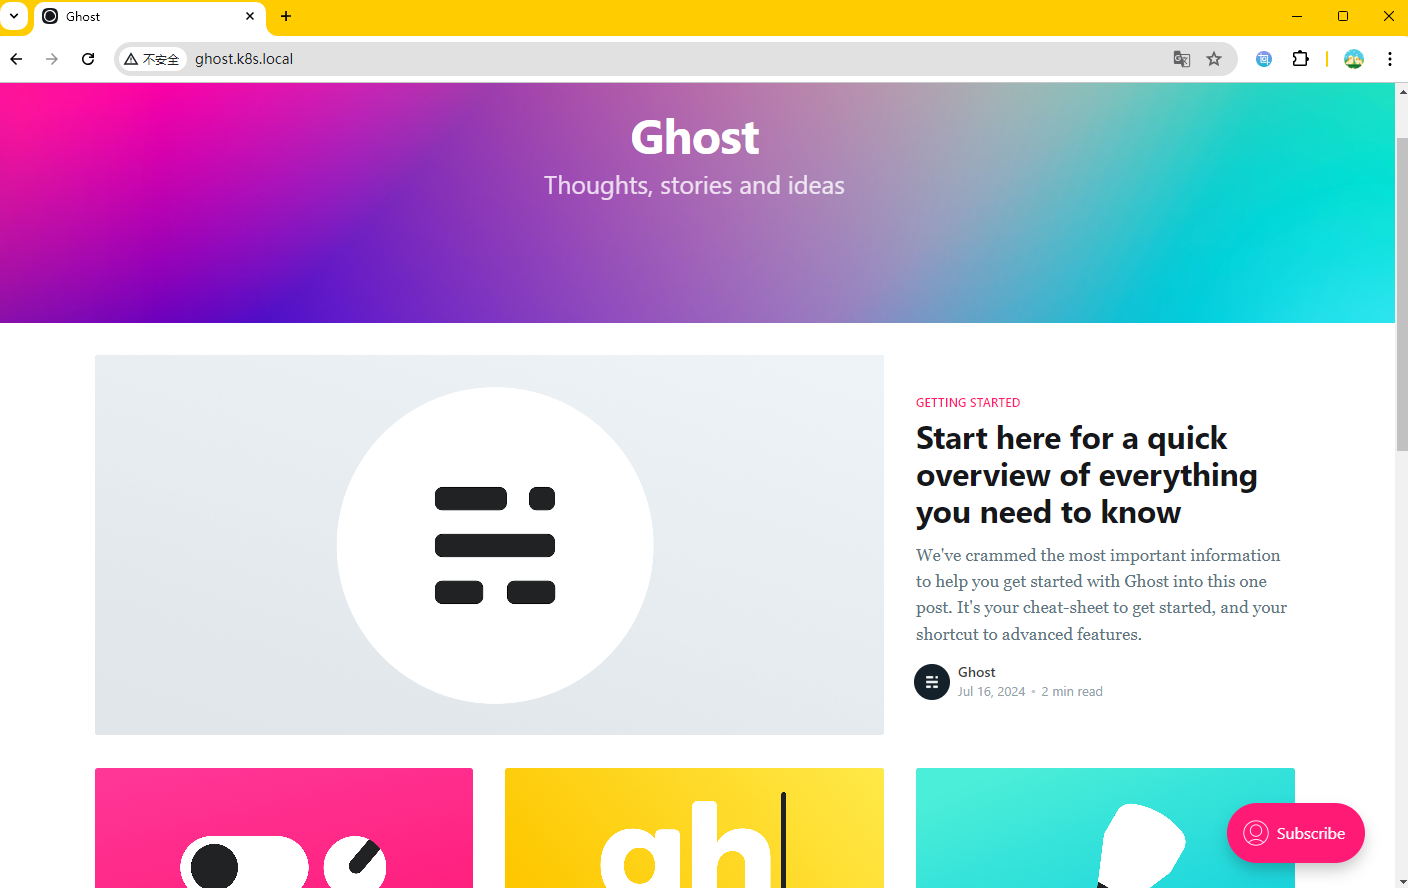
到这里我们就基本完成了这个简单的 Helm Charts 包的开发,当然以后可能还会有新的需求,我们需要不断去迭代优化。
共享 Charts
Helm Charts 包开发完成了,如果别人想要使用我们的包,则需要我们共享出去,我们可以通过 Chart 仓库来进行共享,Helm Charts 可以在远程存储库或本地环境/存储库中使用,远程存储库可以是公共的,如 Bitnami Charts 也可以是托管存储库,如 Google Cloud Storage 或 GitHub。为了演示方便,这里我们使用 GitHub 来托管我们的 Charts 包。
使用 GitHub Pages 来创建 Charts 仓库
我们可以使用 GitHub Pages 来创建 Charts 仓库,GitHub 允许我们以两种不同的方式提供静态网页:
- 通过配置项目提供其
docs/目录的内容 - 通过配置项目来服务特定的分支
这里我们将采用第二种方法,首先在 GitHub 上创建一个代码仓库:https://github.com/cnych/helm101,将上面我们创建的 my-ghost 包提交到仓库 charts 目录下,然后
打包 chart 包
$ helm package charts/my-ghost
Successfully packaged chart and saved it to: /Users/ych/devs/workspace/yidianzhishi/course/k8strain3/content/helm/manifests/helm101/my-ghost-0.1.0.tgz我们可以将打包的压缩包放到另外的目录 repo/stable 中去,现在仓库的结构如下所示:
$ tree .
.
├── LICENSE
├── README.md
├── charts
│   └── my-ghost
│       ├── Chart.lock
│       ├── Chart.yaml
│       ├── charts
│       ├── templates
│       │   ├── _helpers.tpl
│       │   ├── deployment.yaml
│       │   ├── ingress.yaml
│       │   ├── pvc.yaml
│       │   ├── service.yaml
│       │   └── tests
│       └── values.yaml
└── repo
    └── stable
└── my-ghost-0.1.0.tgz生成索引文件
执行如下所示命令生成 index 索引文件:
$ helm repo index repo/stable --url https://raw.githubusercontent.com/cnych/helm101/main/repo/stable上述命令会在 repo/stable 目录下面生成一个如下所示的 index.yaml 文件:
apiVersion: v1
entries:
  my-ghost:
  - apiVersion: v2
    appVersion: 1.16.0
    created: "2022-03-17T17:40:21.093654+08:00"
    description: A Helm chart for Kubernetes
    digest: f6d6308d6a6cd6357ab2b952650250c2df7b2727ce84c19150531fd72732626b
    name: my-ghost
    type: application
    urls:
    - https://raw.githubusercontent.com/cnych/helm101/main/repo/stable/my-ghost-0.1.0.tgz
    version: 0.1.0
generated: "2022-03-17T17:40:21.090371+08:00"该 index.yaml 文件是我们通过仓库获取 Chart 包的关键。
将代码推送到 GitHub
$ git status
On branch main
Your branch is up to date with 'origin/main'.

Untracked files:
  (use "git add <file>..." to include in what will be committed)

        charts/
        repo/

nothing added to commit but untracked files present (use "git add" to track)
$ git commit -m "add charts and index.yaml"
[main aae1059] add charts and index.yaml
 11 files changed, 431 insertions(+)
 create mode 100644 charts/my-ghost/.helmignore
 create mode 100644 charts/my-ghost/Chart.lock
 create mode 100644 charts/my-ghost/Chart.yaml
 create mode 100644 charts/my-ghost/templates/_helpers.tpl
 create mode 100644 charts/my-ghost/templates/deployment.yaml
 create mode 100644 charts/my-ghost/templates/ingress.yaml
 create mode 100644 charts/my-ghost/templates/pvc.yaml
 create mode 100644 charts/my-ghost/templates/service.yaml
 create mode 100644 charts/my-ghost/values.yaml
 create mode 100644 repo/stable/index.yaml
 create mode 100644 repo/stable/my-ghost-0.1.0.tgz
$ git push origin main
Enumerating objects: 18, done.
Counting objects: 100% (18/18), done.
Writing objects: 100% (18/18), 8.71 KiB | 2.18 MiB/s, done.
Total 18 (delta 0), reused 0 (delta 0)
To github.com:cnych/helm101.git
9c389a6..aae1059 main -> main创建gh-pages 分支
接下来为该仓库设置 GitHub Pages,首先在本地新建一个 gh-pages 分支:
$ git checkout -b gh-pages只将 repo/stable/index.yaml 文件保留到根目录下面,其他文件忽略,然后推送到远程仓库:
$ git push origin gh-pages
Enumerating objects: 2, done.
Counting objects: 100% (2/2), done.
Writing objects: 100% (2/2), 301 bytes | 301.00 KiB/s, done.
Total 2 (delta 0), reused 0 (delta 0)
remote:
remote: Create a pull request for 'gh-pages' on GitHub by visiting:
remote:      https://github.com/cnych/helm101/pull/new/gh-pages
remote:
To github.com:cnych/helm101.git
* [new branch] gh-pages -> gh-pages在 GitHub Pages 页面选择使用 gh-pages 分支即可:
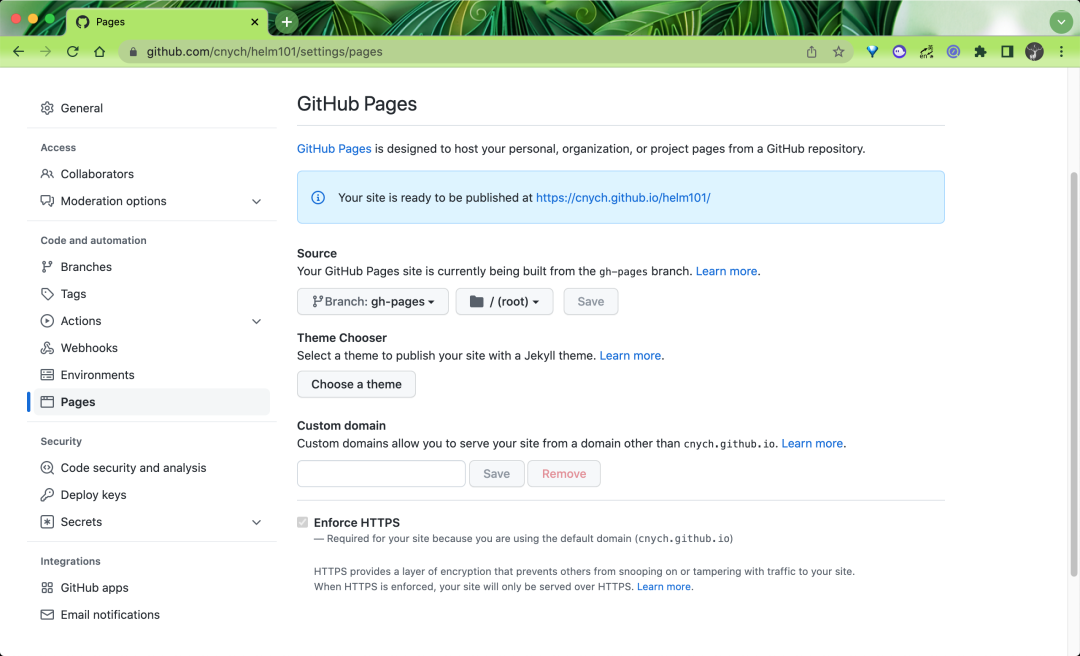
现在我们就可以通过 https://cnych.github.io/helm101/ 来获取我们的 Chart 包了。
添加 Repo仓库
使用如下所示命令添加 repo 仓库:
$ helm repo add helm101 https://cnych.github.io/helm101/

"helm101" has been added to your repositories我们也可以使用 helm search 来搜索仓库中的 Chart 包,正常就包含上面我们的 my-ghost 了:
$ helm search repo helm101
NAME                    CHART VERSION   APP VERSION     DESCRIPTION
helm101/my-ghost 0.1.0 1.16.0 A Helm chart for Kubernetes通过私有仓库安装 Chart
接下来就可以正常使用 chart 包进行操作了,比如进行安装:
$ helm install my-ghost helm101/